1

New Vanity

Monday, April 1, 2013
Hi Everyone!  I am officially moved in to my new place.  Yay!  I still have about 15 bags/boxes to unpack, and I figured if I do one a day, I'll finish up in 2 weeks.  That's fair, right?  In the meantime, I'm messing around w/ some DIY. =)

How do you like my new vanity?  I am absolutely loving it!  And I'm pretty proud I did it all myself.  The desk I'm using is from Ikea (Micke), and runs around $50ish.  I'm sure you could scour for a nice 2nd hand one, but I don't have the patience, lol.  The stool is also from Ikea.  The mirrors are from Target, and most importantly, the lights are from Home Depot ($11.97 per frame + $5 for a pack of 4 light bulbs).

Basically, I put together all the furniture.  Then I figured out where I wanted my mirror to hang, and then placed my lights around it.  Here is the video I used to get my lights vanity ready:
http://www.youtube.com/watch?v=9uEy7LjcyPE

Rosey Qu makes the whole process seem easy, and it really is.  I was a little intimidated at first, especially since we're dealing with electrical wire, but I just bought everything she did (except a 3 light bulb frame and skipped the dimmer).and it was easy peasy.

I am only planning to use these 4 light bulbs...I think 6 would be too bright.  I've considered unplugging the middle two and sticking in bulbs to make it look nicer, but...yeah, I'm lazy, hahaha.  I know the rest of the room looks dark, so I'll have to play around to find out if I can shoot videos on this vanity.  I haven't made a nail tut in FOREVER...and I feel bad that I have all these new subbies.  So yeah, I need to step up. LOL  Here's a pic of my vanity when I was still deciding how to do the lights.  You can't tell, but it's hard to do my makeup because the lighting is really bad in the room.  At least w/ my new lights, my face will be even (in theory...), hehe.

Anyhoo, I've got to hit the sack, but feel free to leave any questions in the comments, if you want to know more about my vanity or whatever.=)

Till next time!

Disclaimer:
1. I bought all the materials for this vanity myself.
2. I was not paid for this blog.
3. I am not affiliated with any of the companies I mentioned.
4. These are my honest opinions.
0

CutePolish's Evanora (from Oz) Nails

Tuesday, March 19, 2013
Hey everyone!  I'll give you a second to recover from shock.  LOL  Yes, another post.  It's been awhile since I was able to churn out a blog 3 weeks in a row!  Maybe it's because I'm procrastinating packing, and finding other things to keep me busy.  Like YT videos and nail art.

So I was just chillin, watching my subscriptions on YouTube, when I came across CutePolish's Evanora Nails.  A long, long time ago, I had a blog post about her 1-up nails (http://miniteababy.blogspot.com/search/label/1Up%20Mushroom).  And then not too long ago, I had a blog post when I tried out her Angry Bird nails (http://miniteababy.blogspot.com/2012/04/31-day-challenge-day-6-violetpurple.html) on my mom.  I got tons of compliments when I had the 1-up nails, so I've tried to at least keep up with watching her tutorials.

I had watched Oz during opening weekend and really liked it.  Mr. Juicy did not like it at all.  He called it "predictable"...and I told him "Duh...we've seen the sequel."  Hahaha  But one thing that I did notice throughout the entire move was Evanora's nails.  I'm glad CutePolish felt the same!  Here's a link to her video: http://www.youtube.com/watch?v=OCch2-j21aw

As you can see in the video, she uses a very pale pink as the background color, keeping truer to the look in the film.  I decided to try a bolder effect by using Zoya's Kimber as a background color.  And then, just to be different, I tried doing a white triangle on my ring finger with black/silver stripes.  On my right hand, I tried a simpler look with just the Kimber in the background and a blue glitter on my ring finger.  I tried a white stripe in the blue glitter, but I did not like the way it looked so I went over it when the blue glitter polish again.  You can kinda see the white in this pic, but I think it actually has a cool effect and I left it as is (I swear, totally not laziness!).

In case you wanted a quick summary of recreating this look:

Step 1: Base Coat (I used Seche's Recondition)

Step 2: Two coats of your Background Color (I used Zoya's Kimber, CutePolish used a Pale Pink)

Step 3: Using striping polish, draw triangles. (I used black, white, and blue glitter.  CutePolish recommends making dots of where you want the points of the triangle to be so that you can make sure the triangles are centered.)

Step 4: Using a glitter striping polish, draw lines down the inside of your triangles.  (I used a silver for the main fingers, and then a black w/ silver glitter striping polish on my ring finger.)

Step 5: Top Coat (I used Seche Vite)

And you're done!!  I think it was fairly simple to do, and my nails look pretty cool.  It's almost like having claws w/o actually having claws, hahaha.  Such evil nails *insert evil laugh*.  So why was Theodora surprised?!?  Oh, um...spoiler alert?  Hahaha, sorry...I hope I didn't ruin the movie for ya if you haven't watched it yet!


As a sidebar, I also wanted to show you my St Patty's day look (which was full of fail):

This look was inspired by (okay, I was actually trying to dupe, but I totally didn't have the right polishes/supplies) Meliney's St. Patrick's Day Clover Tutorial (http://www.youtube.com/watch?v=Fm6RStqQs0s).  At the time, I didn't have my white striping polish, so I muddled through w/ a thin brush and Zoya's Envy (the dark green).  It didn't work out so well..I am soooo out of practice!  But have no fear, I will *try* to have more nail art when I move.  The lighter green is Zoya's Tangy.  And I just threw on some green heart rhinestones.  Maybe I should've put 3-4 on a nail to make a fake clover.  Meliney does that on her ring finger in the tutorial.

I wasn't thrilled w/ my results for St Patty's day, but it was cute enough for me to sport.  I was very happy to remove my polish yesterday and to do my new look.  If I attempt to do this look again for next year, I will make sure to have all the necessary tools on hand!

Anyhoo, again, I'm filled with uncertainty of when my next post will be, but I am on a pretty good roll, so who knows? =)

Till next time!!


Disclaimer:
1. I bought all of the products I used in this post myself.
2. I am not affiliated with any of the companies of the products I used.
3. I was not paid to do this post.
4. These are my honest opinions.
0

Moving! & Beauty Blender Dupe Mini Review

Wednesday, March 13, 2013
Hi Everyone!  I know, I know...shocking!  Another blog already!?!

So yes, as the title of the blog states, I am moving.  It's a little bittersweet because I'll be moving away from my beloved Los Angeles, but I'm moving for a good career path.  *Sigh*, the sacrifices! LOL  For safety reasons, I will be vague, but I will be moving to Phoenix!  I know Phoenix is big, but who knows...you might be able to find the one azn girl running around...hahaha.

Anyhoo, so the point is, I may have some free time in the near future to upload more videos and more posts.  I feel bad that I have quite a few new subscribers on YT, yet I haven't posted a video in over a year.  How embarrassing!!!  I will have to make a nice tutorial when I have some time to spare.  Hopefully my new place will have some bomb lighting, so I can shoot a great video. One of my issues has always been lighting for my videos and pictures. =/

Moving on to the mini-review!

So...many of you have probably seen something like this sponge at Sephora.  The Sephora version is called BeautyBlender and is pink.  It's also like $20+ !?!  So I, being the economical girl I am, decided to look for a dupe.  I know that there are some dupes at Ulta and other places, but I actually found one for $2.  Go me. Hehehe  Caveat: I had to buy 10, LOL.  So I spent $20, but I got 10...I gave a bunch away before I even tried using the product.  But then (dun dun dun...), I used it.  I didn't actually do any research on how to use it...just decided to swipe it in some powder foundation, and then put it on.  It was terrible!  It put WAAAAY too much makeup on.  I was like, "Omg, what is up with this?  Why do people rave about it?"  Seriously, wtf?  Oh yeah...Maybe I should read/watch the how-tos first?

So...what I did wrong:  I did not get the sponge damp first!  A pretty informative video: http://www.youtube.com/watch?v=Zh0eyzzkViI&list=HL1363207161

My bad.  So I was kinda bored, going through random YT videos (mostly suggested ones), and one of them was a BeautyBlender v Ulta Dupe (I think by LePooke), which caught my eye...and then a light bulb clicked on.  It is super important to soak up a bunch of water into the sponge, and then wring it out.  Then pat/wring in a towel.  The pic above shows the difference between a wet sponge (left) and a dry one (right).  As you can see, the wet one is almost double the size of the dry one.  This makes the difference between too much makeup and a flawless finish.

The main reason you should soak a sponge in water first is because that way it won't absorb as much of your makeup into it.  But it also makes the pores in the sponge bigger (or something) so when you apply your makeup, it's less dense.  Does that make sense?  Ooooh, I'm a poet and I didn't even know it! Hahahah

Seriously though, I definitely recommend trying this product.  For personal reasons, I am not linking the site where I got my sponges from, but I'm sure they are easy to find.  Since I never tried out the BeautyBlender or the Ulta dupe, I have nothing to compare this to.  Sorry if this review seems all over the place...I just kinda wrote as I thought vs organizing my thoughts first and then write. =)

I don't plan to count this as my "April" post, but in case I get too busy with my move, hopefully this will tide you over.  Till next time!!

Disclaimer:
1. I bought the sponge with my own money.
2. I am not affiliated with any of the companies I mentioned nor the company I bought the sponge from.
3. No one paid me for this review.
4. These are my honest opinions.
3

iSpa First Imipressions/Review

Wednesday, March 6, 2013
Hi Everyone!  I hope you are all doing well.  I don't have a ready nail pic to post, so instead, you get the joy of my son, TnT. =)  Isn't he adorable with my glasses? LOL

I'm sure you're surprised that I'm blogging again so soon, but I just HAD to share my experience with iSpa...a Korean Spa in Irvine, CA.  My two girlfriends and I had planned this day for about a month.  We read the reviews on Yelp and knew what to expect...kinda.  We were definitely intimidated by the fact that people would be walking around us butt naked, but hey...we could be grown ups and deal. =) Hahahah  So here's how our day went:

We checked in at the front desk.  We had already made an appointment for the scrub-massage, which included the spa fee ($70).  We had to pay the $70 up front, and we were given a "uniform" and a locker key.  Now mind you, I didn't actually bring anything besides my wallet and cell phone.  None of the reviews mentioned the need of anything, so I just went in "blind" lol.  When we entered the women's side, we were greeted by a hallway full of little lockers.  Our keys opened up the lockers (digital keys, might I add...pretty high-tech!), and we looked into these lockers like wtf.  They were super small...and wouldn't fit some of my friend's purses.  Luckily for me, I didn't bring much, so I could've squeezed all my stuff in.  Until, one of my friends read a sign "Shoe Locker". LOL  They were super small because they were only meant for shoes! *Whew!* So we throw in our shoes, lock the lockers and move on to the "real" lockers.

The regular lockers (opened by the same key, might I add), were relatively big, and came with a hanger.  We changed into our pink uniforms.  Basically, it was a light pink t-shirt and dark pink shorts.  I took off my bra, but left on my panties...I'm not sure if you are supposed to, but I definitely felt more comfortable that way. =)  Our appointment was at 3:30, but they recommend that you arrive at least 30 min prior to your appointment, so you have time to shower.  So we stepped out to what I dubbed, the Naked Room.  We had to get nakkid, and then use a tiny towel to dry up.  For me, that meant I could either cover front or back or top or bottom.  I elected for front.  One of my friends elected for bottom. LOL  Some people didn't even care and just had the towel wrapped up in their hair.  After taking a look around, we opted for the sit-down showers.  Each station was well lit, had a portable (not sure if I'm using the right word here, but hopefully you know what I mean) shower head, a little stool to sit on, and a basin.  Each was also equipped with shampoo, conditioner (Tresemme, Costco style!), and a bar of soap (something greenish...wish they had Dove!).  So we each grabbed a station, and went at it.  We were pretty much out in the open, but at this point, we were pretty much over the whole naked reservations, lol.  I wasn't sure what to expect from our scrub-massage, so we actually washed our hair along w/ our body.  It turned out later that they wash your hair for you in the scrub-massage.  So yeah...now we know (for next time!).  After rinsing off, we went to the dry sauna (sorry...I didn't even go into the wet/misty sauna because I always feel like I can't breathe!) for a few minutes.  It was pretty hot, and my friend couldn't take it anymore, so we went to sit by the hot tub.  We were actually supposed to get in and soak, but my friend thought the water was too hot, and we just ended sitting on the edge and soaking our feet, lol.  Soon there after, our number was called (they go by locker numbers, fyi!), and the scrub-massage commenced.

The employees here aren't naked. They were a black lacy bra & panty.  I had Jina as my person, and she was very professional.  She had me tie up my hair, and then lay on my stomach on the bed.  The beds were very cute...hot pink!  And made from some type of waterproof material.  She did put a nice warm, wet towel across my back and covered my butt.  It did feel better that I was semi-covered.  And then she started scrubbing with these abrasive mitts across my body.  She started at my feet and slowly worked her way up my body.  Then she had me flip over and scrubbed my frontside.  Yes, she scrubbed my butt and boobs.  She didn't even hesitate, lol.  She used some type of bar soap while she was scrubbing, and I saw some of the chunks of dead skin coming off.  It wasn't pretty...it was more along the lines of GROSS and disgusting!!  After she was done, she had me go take a shower (w/o giving me a towel, so I had to run (or walk fast, lol) naked to the showers for a quick rinse off.  Then come back and she had me dry off.  While I was gone, she had cleaned off all the dead skin from the bed and floor.  After she finished drying off the bed, she had me lay back down, on my stomach.  She did a massage pretty much the same as the scrub, starting with the feet and working up.  This was definitely NOT a relaxing massage.  It was more of an accupressure massage, where she would push hard in specific ares.  Although some points were a little painful, overall, it felt pretty good and afterwards, I was very relaxed.  She spent more time on my back than any where else, but she did hit some spots on my butt that hurt, lol.  She had me flip over and she washed my hair.  Afterwards, she began grating some cucumbers.  She washed my face (with a massage), and then rinsed it off.  She then put the grated cucumbers on as a mask, and put something soft over my eyes.  After that, she massaged my neck and shoulders (and boobs!).  This part of the massage was VERY nice...because that area is where I carry most of my stress.  She wiped off the cucumber mask and had me sit up.  Then she asked me to hold out my hands and squirted a warm milky liquid into it.  She told me to wash my face with it...and it felt very nice and moisturizing.  She also squirted it all over the rest of my body and told me I was done.  She then gave me an envelope with her name on it and I was done!  I rinsed off (wasn't sure if I was supposed to or not!) again, and then got dressed in my uniform.

We dried our hair, and decided to check out the co-ed areas (yes, prior to this all the areas were strictly females only).  Me and a friend decided we would be more comfortable w/ a bra, so we went to the locker and put ours on before heading to the co-ed area.  There was actually a sign on the door that said you needed to wear the uniform...I actually didn't know it was co-ed until my friend told me! LOL  But we checked out the food court (passing by a guy sleeping with a piece of wood for a pillow), and it was pretty good.  We tried a snack (Kimbap) and I tried a Caramel Frapp (they just asked for our locker number and put it on our tab).  The kimbap was very tasty, and the Frapp was pretty sweet.  In the food court, there is a "Light Therapy" room.  We tested it out for a couple minutes, but I'm not sure what it was supposed to do, lol.  Maybe relax you?  Unfortunately there's a very limited area where you can eat/drink, so we basically stuffed ourselves and then headed out to see the rest of the co-ed facilities.

First, we checked out the Fire Room.  It literally felt like I was in fire...even the bottom of my feet were burning.  I would totally wear socks in that room!  We couldn't really take being in that room for too long, so we decided to check out the next room.  This room was the Salt Room.  Oh man...the salt was WONDERFUL.  It was pretty hot in that room as well, but there were these towels laid over the salt and was very nice to lay on.  I think the salt was heated, and it's supposed to suck out impurities.  I enjoyed using the little neck blocks while laying down.  We just chilled for a few minutes and then moved to the next room. This room was called the Forest Room.  It was the coolest of the heating rooms, but still pretty warm.  It smells pretty piney and earthy.  We also just relaxed in here for a few minutes and then moved on to the Ice Room.  The Ice Room is basically a freezer, with a few jade stools to sit on.  There was a lady sitting down inside already, and she told us that we should bring a towel to sit on.  I guess we'll know for next time.  I tried sitting in the chair w/o a towel and my butt froze sooooo fast, lol.  I think we literally spent one minute inside and then checked out. LOL

We made our way back to the locker room and changed.  When we got to the front, we turned in our keys and paid our balances (from the food court).  Then we threw in a tip in the envelopes (there's a box for these near the cashier) and took off.  **Note:  They only accept cash for tips!!  They do have an ATM in the front, but I'm sure it has a humongous fee, lol.

All in all, iSpa was very fun.  We are planning to go back next month!  I would definitely recommend it to everyone, BUT...just don't be all caught up on the nakkid part.  I think it helps knowing exactly what to expect when you get there, so you don't look like a deer in the headlights.  Like we did.  But next time, we will totally be able to breeze through the process, and have even more fun!  I am very excited to go again.  But in the meantime, I will enjoy my baby-soft, super clean skin. =)

Things I would change for next time:
1. Go HOURS earlier than the appointment so I can relax in the co-ed area (especially in the Salt Room!).
2. Bring cash for tips.
3. Bring a facial mask to throw on (either after the scrub or while chillin in the Salt Room).
4. Don't wash my hair right before I go!

I hope this review helps those of you curious about Korean spas!!

Till Next Time!

Disclaimer:
1. I paid for iSpa myself.
2. iSpa did not pay me for this review.
3. I am not affiliated with iSpa.
4. These are my honest opinions.
0

The Nail Boutique (Temple City, CA) Review

Wednesday, February 27, 2013
Hi everyone!  Viola!  My February post!  Shocking, yes, I know. (Can you tell I've been watching Finding Nemo much?  I think it's around 50 times and counting....blame the kid, lol.)  And for all you normal people who don't get the silly reference - HIyeeee!  This month has totally flown by.  I have a review for y'all, but it mostly applies to those living in/near the SGV (aka San Gabriel Valley or the 626).  Picture on the left shows my manicure after 2 weeks.  Sorry I don't have a fresh one!

My best friend took me out on a girl's day for my bday.  I chose the place, The Nail Boutique (http://www.yelp.com/biz/the-nail-boutique-temple-city-2#query:nail%20boutique), because I had never been there, and it was within 5 miles of my parents' house.  (Please don't stalk them, lol.)

Originally we had planned to just get a manicure or maybe a mani/pedi, but their employees talked us into getting a gel manicure.  It was $25, which I thought was very reasonable.  They had a bunch of colors from CND (Shellac) and Gelish, and possibly one that looks like Gelish, but is probably called Daisy or something.

I never got my manicurist's name, shame on me!  But she was quiet efficient.  She actually soaked my nails in soapy water, like a regular manicure.  I had never had a gel manicure with that, so I thought it was a little strange......but....the end result is undeniable.  My manicure lasted 3, yes THREE, weeks.  Of course there was a smidge of wear and tear the tips and that ugly nail growth, but I was lazy testing to see how long the manicure lasted.  So backing up, she soaked my hand in soapy water while she cut the other one down and removed polish.  Then she soaked the other hand while she filed and cut down the cuticles.  After that, she did a quick massage, and put on the cuticle oil.  She wiped each nail with alcohol, and then lightly buffed the tops.  I noticed she used the Gelish PH Bond, but the Shellac Base Coat.  Between each coat, she would have me cure my nails under a UV lamp.  She put 2 coats of the Shellac color, and one coat of Water Field (a Gelish glitter), before adding a top coat (Shellac again).  The whole process took about 45 minutes, and it was well worth it.

I've never had a gel manicure stay on my nails so long!  I think it is the soaking in soapy water, or possibly the Shellac Base Coat.  I have to say, I was pleasantly surprised that manicure was still going strong after 2 weeks.  It was still there after 3 weeks on my left hand, but a few nails had chipped on my right hand.  Finally, the growth was just killing me, so I removed the polish.

Soo...yes, I would recommend The Nail Boutique to those of you in the 626, or maybe even if you visit the 626.  I am considering checking out a place in Arcadia, for some Japanese nails.  I don't really want to go acrylic, but they look soooo good.  Especially smothered in little resin Hello Kitties and My Melodies. LOL  Maybe I'll get them done up for a friend's wedding in April.  =)

Anyhoo, I hope this review helped some of you out there!

Till Next Time!

Disclaimer:
My friend paid for my manicure, but is not affiliated with The Nail Boutique or its employees.  I am also not affiliated with them.  It was only after the manicure lasted so long that I decided to do a review.  The Nail Boutique did not pay me to write this review, and these are my honest opinions!!
0

31 Day Challenge - Day 17: Glitter

Tuesday, February 5, 2013
Hey Everyone!  This will probably be my last post of the 31 day challenge.  As most of you know, I have taken over a year to get to Day 17, and I can tell you, I am not feeling very inspired at the moment.  I actually had done this look a couple months back and had started the post, but never finished it.  I figured I would go ahead and at least update y'all with what I'm doing and what I have planned for 2013.

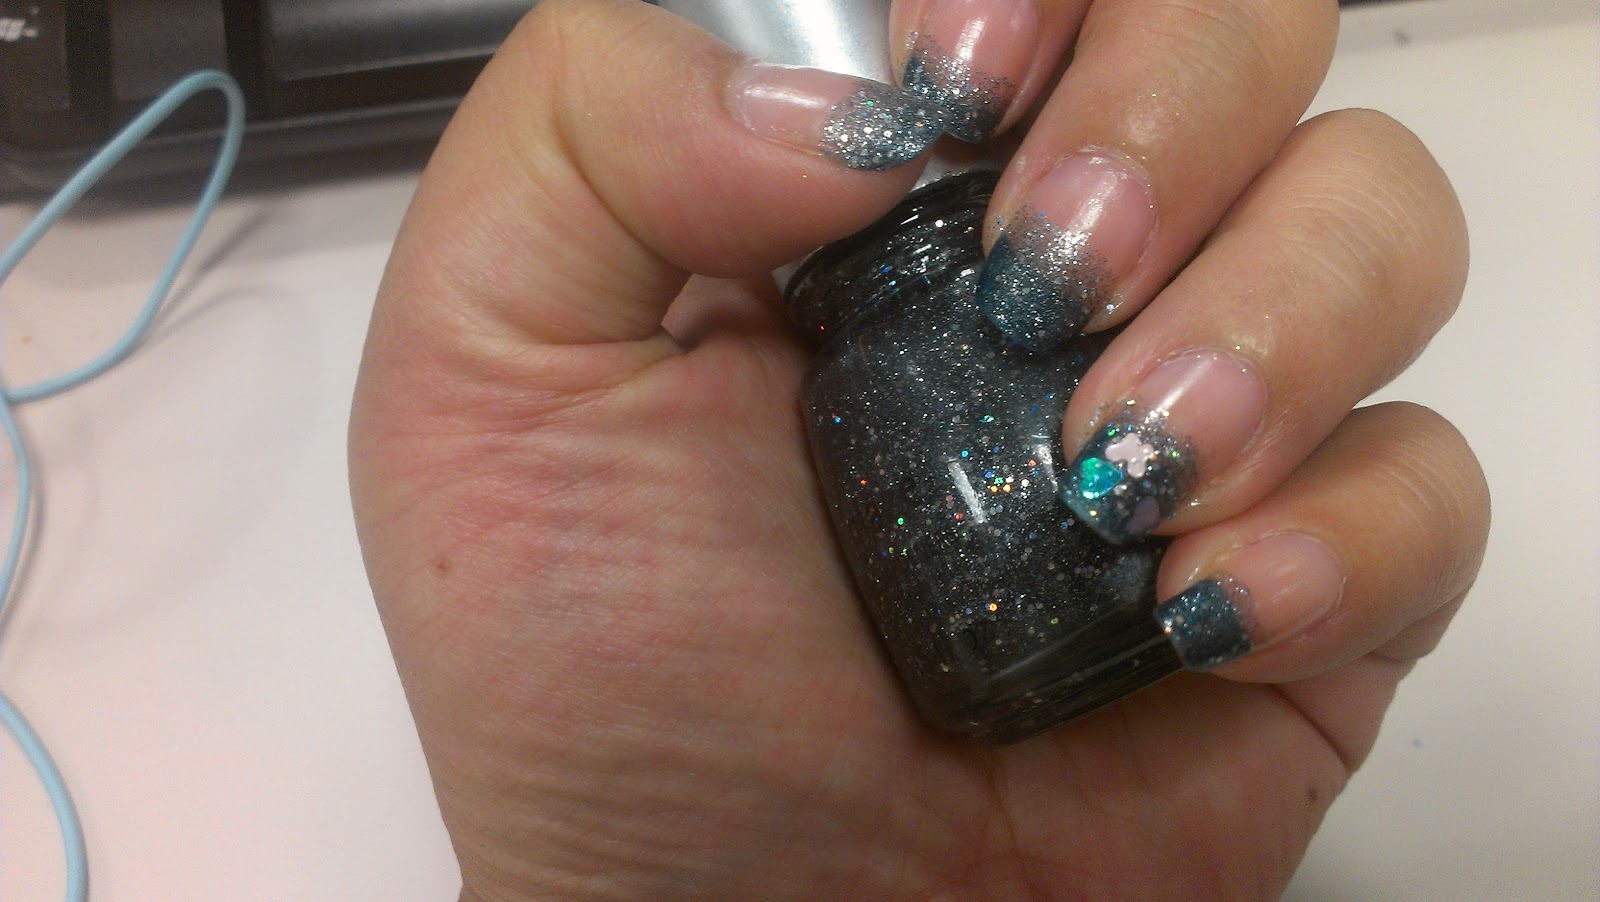
Similarly to Day 15, I am wearing OPI's Yodel Me On My Cell on my tips, with China Glaze's Shooting Stars on top.  I had applied both with a sponge, and faded it as I got higher (or is it lower) on my tips.  Then, on my ring fingers, I added this polish that had butterfly glitter in pinks & blues.  I actually liked the way this turned out, which is a nice change considering I haven't liked the last few looks I sported. =)

Sooo, a quick update on where I am in my life.  I am sorry I haven't been posting as much as I would like.  Every year, I make a resolution that I would like to have more blog posts.  And I do try...but I will try harder this year.  Especially since I'm setting more realistic goals (more on that in a few).  My little one is now 2 years old (crazy, isn't it?).  Here's a pic from his birthday in November:
Excuse the fact that I have bare nails!  I had so many things to do to prep, and didn't have time to do them.  Soon after I had taken the pic of my nails (above), my nails started getting all weak and kept breaking.  It has taken me this long to grow out a decent set of nails...and then I went and got them done up with some gel polish at a local salon.  That will also be a future post! LOL

Anyhoo, so I've pretty much been working full-time for about a year, and I had spent countless overtime hours trying to finish up projects.  At least for now, everything has settled for a bit, and I will hopefully have more time for posts.  I will be celebrating my 3rd wedding anniversary next week! Feels like forever to me...but, then again, we dated for 9 years before tying the knot, lol.  Regardless, I feel super happy and blessed that my life is finally on track and going well. =)

Soooo...plans for 2013.  I am going to start with the realistic goal of blogging at least once a month.  I know this is a little late, but I will count this as my January blog. =)  I think there is no excuse not to have 12 blogs up by December.  Ideally, I would like to go more often than that, but let me just start w/ this for now. =) LOL  I also plan to put my name in for the Nike Women's 1/2 Marathon in October.  It will be my first time trying anything crazy like 13 miles, and I plan to start training soon.  As soon as my treadmill has some space in the garage, lol.  I also have plans for my online store (http://teacraft.storenvy.com), to try to make it a good side business.  At the moment, I am just selling perlers, squshies, and plushies, but I want to maybe expand to polymer clay charms or even resin charms.

So yeah, I have lots of things to keep me busy!  But, I will try to keep up with blog this year.  For sure.  I promise!  =)  I am also on Pinterest, and will be building up a nice board on cool nail art.  If you want to follow me, my username is MiniTeaBaby. =)  I don't think I've actually spoken about my Lasik experience, and I also need to talk about the Flash N Go.

Blah, I'm babbling.  So yes! Till next time!

Disclaimer:
1. I bought all of the products shown in this post.
2. I am not affiliated with any of the companies of the products shown.
3. No one has paid me to write this blog.
4. These are my honest opinions.
2

31 Day Challenge - Day 16: Tribal Print

Tuesday, August 7, 2012
Hi Everyone!  I am actually pretty happy with the way my Tribal nails turned out.  I couldn't get a super clear pic of them, but basically the design is a tribal sun, which I painted over a sparkly Zoya color (will update when I find the name!).  I just liked the overall look of it...kinda like a sun with a fiery background.

I know a lot of people went with more Aztec-like tribal designs, but I leaned towards a tribal tattoo-like design.  I guess mine's more like a design than a print, but whateverz.  I was just happy that my nails looked decent this time!  Especially since the last couple looks were full of fail.

But I'm even more excited about the next challenge: Glitter!!!  You know I love me some glitter!!  I have so many to choose from, and a few ideas of how I want to sport them...so I will definitely be posting Day 17 soon.
Just 15 more days of the challenge remain.  I am determined to finish by the end of the year! LOL  I'm almost there...I think I can do it! =)

Anyhoo, till next time!