Showing posts with label Gelish Harmony. Show all posts
0

Gelish Magneto Review

Monday, June 4, 2012
Hi Everyone!  I had to run to TWO Sally's on Friday, but I am happy to report that I was finally able to get a couple bottles of the Gelish Magneto polish: Inseparable Forces (Blue) & Electric Metal Lover (Red).  Sounds a little patriotic, hahahah.  I also grabbed a pack of the 3 magnets (wavy, straight, and star).

Let me tell you, when I first looked at the bottles, I was kinda disappointed.  I was paying as much as a regular full-sized bottle, but only getting a mini-bottle that would do about 10 manis (a normal full-size does closer to 40).  Second of all, everywhere else online had the kit (which was what I was expecting) that included a full-sized bottle plus a matching non-gel bottle of magnetic nail polish (and a magnet).  I mean...if I didn't pick up the extra magnets, I wouldn't have gotten any at all!  So...first impression, not the greatest.

I decided to test this on my mom's nails first (poor guinea pig!).  I tried all 3 of the magnets on Electric Metal Lover, and had mixed results.  I wish I took a pic of her nails, and I'll update if I do. =)  But as far as I can tell, the wavy lines and straight lines are the best of the bunch.  The star just didn't work for us, and my guess is because our nails were too short/small.  But anyhoo, let's go with the steps first.

1.  Push cuticles back and shape your nails.
2.  Lightly buff the top of your nail, just to get rid of the shine.
3.  Clean nails with alcohol (or nail cleaner).
4.  Apply PhBond.
5.  Apply foundation gel then cure. (Try to get this layer on as THIN as possible!)
6.  Using a clean brush or lint-free wipe, get rid of tackiness.
7.  Apply one coat of magneto polish and cure (for 30s if using an LED lamp, 2 min if using a regular UV lamp.)
8.  Apply 2nd coat of magneto (don't cure yet!) to one nail.
9.  Hold magnet above the nail, as close as you can get without touching.  NailHarmony recommends 5 seconds, but I feel that 10 seconds is more appropriate.  The lines are more distinct and hold the shape better.  It is very important that you put on a coat of polish and use the magnet right away for each nail. Try to hold the magnet as steady as you can!
10.  Repeat for the rest of the hand.
11. Cure for 30s if using an LED lamp and 2 min if using a regular UV lamp.
12.  Apply top finish then cure.
13. Use alcohol on a lint-free wipe to get rid of tacky layer.
14. Admire your handiwork!

Now, you can cure after each nail for the 2nd coat of the magneto polish, but I didn't find that was necessary.  This is a relatively quick process, and you can easily finish one hand without worrying that the magnetic-ness will separate (did that make sense?).

On my right hand, I did a little bit of experimenting (left hand is completely the Inseparable Forces for both coats).  For the first coat of magneto, I used Electric Metal Lover on every finger except my ring finger which is Inseparable Forces.  After curing that, I used Electric Metal Lover for the second coat on every nail except my middle finger which is Inseparable Forces.  So, a quick recap would be that the experiments were on my ring finger - Blue base and Red 2nd coat and my middle finger - Red base and Blue 2nd coat.  I absolutely love how my middle finger turned out.

My pointer finger looks funky because I didn't hold the magnet over the nail long enough and I tried to fix it by replacing the magnet over the nail for a longer period of time.  This did not work...so I guess there is a time limit as to how long you have to use the magnet for before it doesn't work right.  Hence, why I said it was important to do each nail individually and quickly. Another important tip is to hold the magnet as steady as you can.  To achieve this to the best of my abilities, I rested my hand flat on a table, and then lightly rested the tip of the magnet on my cuticle area.  I found with this method, I was able to remain fairly steady for 10seconds.

My thumb looks a little funky because I didn't stick the finger in all the way and the nail didn't cure properly...and when I swiped the top coat, everything just smudge.  I didn't really have time to fix it, so I just left it for now (well, I re-did the top coat, but that's just about it).  I'm getting lazy in my old age, what can I say? Heheheh

Here's a closer look at my middle finger and ring finger.  Sorry my camera shots have been kinda blurry.  I think I will invest in a better camera soon enough...but for now, we'll have to suffer through these shots.  I'm not sure if you can see it, but the middle finger has a hint of red underneath, and I really like how that turned out.  The ring finger's purple hue has been a hit at the housewarming party on Saturday. =)  (Excuse my poor sentence structure, but you know what I mean!)  You can also see a better look at the non-waviness of my pointer finger.  You can kinda see lines, but it's mostly smooth.

Kk, to the break down:

Pros:

  • The wavy and straight lines look awesome...if you want a quick, funky nail, this is a nice route.  
  • I've worn this all weekend, and no chipping.  I'm pretty sure I won't see any for at least another week or so.  I think it's awesome Gelish was able to figure out how to combine their system with look of a magnetic polish!
  • Colors on the bottle is pretty accurate.

Cons:

  • Price - definitely paid more than a regular bottle of Gelish or Magnetic Polish, but I think that was my bad.  I've seen the kit with both for $19.95, which I feel is reasonable.
  • Slight learning curve - took me a few tries on my mom's nails to get the hang of it, and even then I messed up 2 nails. =)  Eventually, your nails will come out great!
  • The polish I got did NOT come with magnets...had to purchase them separately.  And even then, the star magnet did not work as well as I would have liked.  I'll try to do another post with just the designs.  If you get the kit, it comes with one magnet.
Would I recommend?  Of course!  Everyone I know that uses Gelish is super excited about the Magneto, and I don't think they will be disappointed...unless they didn't buy the right thing, like me. LOL  I'm not disappointed in the polish itself, so I'll try not to let me hold that against them! =)  I suppose it was my fault in buying it at Sallys instead of where I normally buy it. =/ Woe is me.  Overall, this product does exactly what I expected to, and that's what matters to me.

Anyhoo, I hope this review was helpful, even if I kept jumping from topic to topic.  I obviously don't organize my thoughts before I start blogging, hahaha.  But I like it this way...and I hope you do to.

Till next time!

Disclaimer:
1. I bought every product I used in this blog.
2. I am not affiliated with any of the companies who's products I used.
3. I did not get paid for this review.
4. These are my honest opinions.
0

Random Gelish Manicures

Friday, June 3, 2011
Hi Everyone!  It's been a couple weeks since my last post, so I thought I'd just do a quick look at some of the Gelish manicures I've done. =)

This pic the left is just a simple glittery tip.  The base color is Desert Sands and the tip color is Night Shimmer.  To achieve this look, I used two coats of Desert Sands, then used a sponge to dab on Night Shimmer on the tips.  I concentrated more at the edge of the tip, so it had a faded effect.

I had a couple bumps because I didn't remove my last Gelish manicure properly, and didn't notice until the I had already cured a layer of the Desert Sands.  *sigh*  Shame on me for being lazy!!

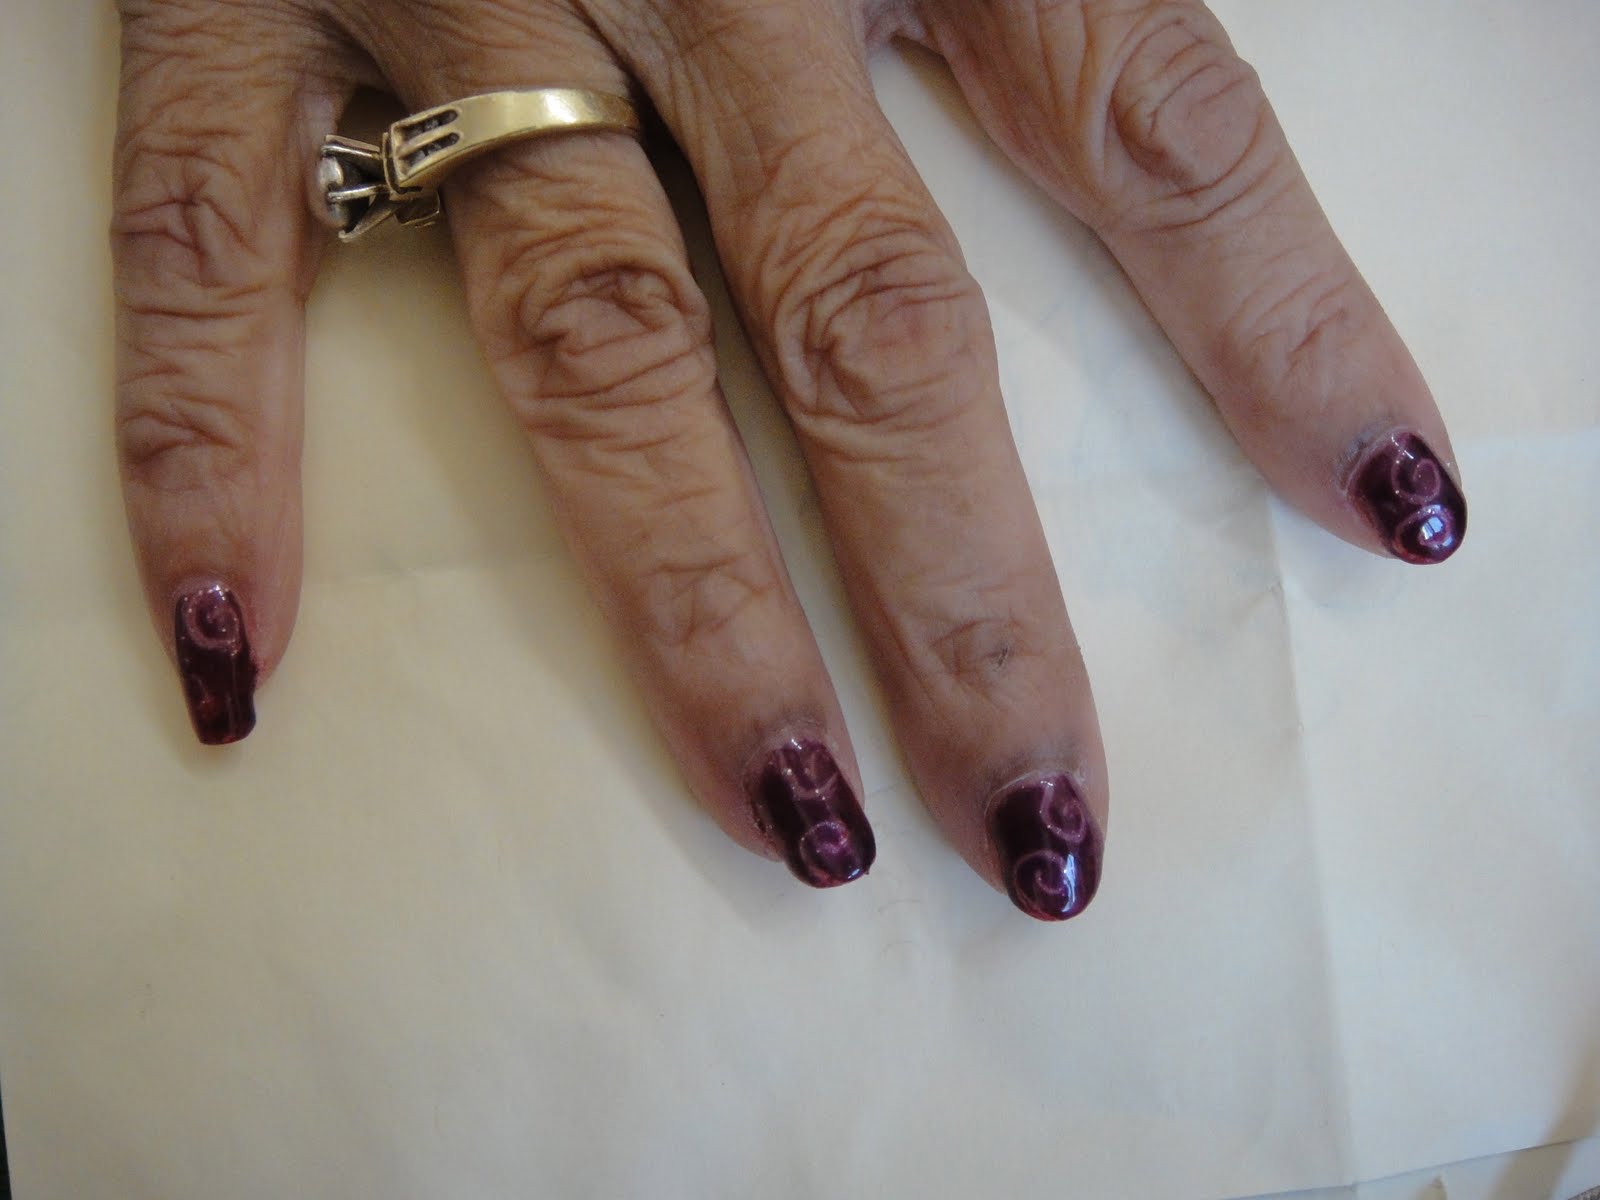
This next manicure is one I did on my mom.  I had found a video on YouTube and tried to follow her design.  Unfortunately, I don't have the link, but I'm sure it's easy to find if you search for Gelish Design or something (it's a 5 or more part series of videos).  Basically, after the Foundation coat, I put Vegas Nights all over the nail and cured.  Then Good Gossip on just the tip and cured.  After, I put a dark purple (don't have the name right now, sorry!  Will try to update) over the whole nail.  Before curing, I used an orange stick to draw out the swirls on one hand, and flowers on the other.  I let that cure, and put on a top coat.  In the end, I wish I chose more contrasting colors, but I think they turned out decent for a first try.

Next time, I'll try to have a design in front of me, versus just winging it. LOL


This next design was done on my Aunt from SF.  It's the same concept, but instead, I put a neutral colored base over the whole nail, and only did the design on the tip.  Under the pink, I had Vegas Nights.  Then I covered it up with Go Girl.  I used an orange stick to put in the lines so the glitter underneath would show.  Unfortunately, it was kinda too light to see.  But my aunt didn't want anything too flashy anyway. =)  On the pinky, you can see a couple darker pink glitter...it's because I added a coat of Tumberline Violet to the tip and tried to arrange the glitter so it would peep through.

This last design was done on another Aunt.  She's not really allowed to wear nail polish at work, so I try to keep her nails more subtle.  But I needed to make this stand out a tinsy bit, because she was going to a wedding, so I came up with this color combination.

The base color is Forever Beauty, and the tips are High Bridge.  Just like my own manicure, I applied High Bridge with a sponge.

I think (hope) it's not overly noticeable! LOL


I had one more design, but for some reason I can't find the pictures for them!  Grrr...I think it was on my phone and I recently just got a new one.  I'll hunt for it....

Well, I hope you enjoyed this post on different looks I've done with Gelish.  Hopefully, I'll be able to try out more designs on my guinea pigs LOL.

Till next time!

Disclaimer:
1. All the products were given to me as a gift from ShearUp.com.
2. No one is paying me for this blog.
3. No one has asked me to do this blog.
4. These are my honest opinions.
0

Quick Update on D Spot Salon

Thursday, May 19, 2011
While posting (and stalking!) on Facebook, I saw an ad for.....D Spot Salon!  They're apparently having a deal right now where you can get a Gel Manicure for $20 (normally $35).  Just thought I'd pass this along to anyone in the LA area that's interested in trying it out. =)  The deal is on Lifebooker Loot.  And FYI, I'm not getting anything for this post or if you buy the deal...just randomly saw it and thought it was a good deal, lol.  Be warned: this deal is only good until Friday!


If you have any questions about D Spot Salon, don't hesitate to leave a comment. =)
9

Gelish Manicure + Review on 6G LED Lamp

Thursday, May 5, 2011
Hey Everyone!

I know I know, I've been gone forever....shame on me, blah blah, lol.  But I'm happy to report that my little one is about 6 months, and isn't quite so needy anymore.  He actually takes some time to play by himself now, yay!  So, hopefully that means more time for blogging and videos!  One can dream, right?

Anyhoo, I collaborated with a good friend of mine, who's a licensed cosmetologist, to create a video on the application of Gelish Polish.

ShearUp.com was nice enough to provide us with all the Gelish Products.  Please note that they are not compensating me for this blog or the video I created.  The thing I loved the most was the LED Lamp.  This lamp retails for $329.99 (I think...), and it is frickin' awesome.  It really does cure the gel in seconds!  More on that in a bit.

Here's the video:

Link: http://www.youtube.com/watch?v=obm6XGtN-SI

What We Used:
Buffer (sorry, don't know the grit!)
Gelish PH Bond
Gelish Foundation Gel
Gelish Jet Set
Gelish Top Seal
Rubbing Alcohol
Gelish 6G LED Lamp

I know we could've fast-forwarded through all the curing and stuff, but I just wanted to show the entire manicure, in one cut, in real-time.  Just to give you a sense of what it's really like. =)  Sorry for the weird editing at the end!

Note: Cure times based on Gelish's LED Lamp.

Manicurist:
Denise
"D" Spot Salon
684 S. La Brea Ave.
Los Angeles, CA 90036
(626) 695-6837
www.dspotsalon.com

I think she normally charges $35 for a Gelish manicure. =)

It was fun shooting the video with her, and I feel like I benefited from watching a professional apply Gelish.  Apparently my manicures on my mom and friends look very amateurish compared to hers.  But, then again...she IS a professional! LOL I definitely intend to try out her methods the next time I give someone a Gelish manicure.  (Please note, I only give them to my mom and a few select friends/family...and I do it for free, hehe.)  Things to do: Keep coats thin, cap the edges, make sure your whole hand is in the lamp. =)

Now, onto the mini-review.  I got this Gelish 6G LED Lamp, and I am totally enjoying it.  I've only used regular UV Lamps before this, so I'm afraid I don't have much to compare it to.

Basically it's just large enough for one hand or foot to fit inside.  The stand makes it tricky to put in your foot.  With the basic UV lamp, you could just put your foot on the floor and slowly slide it in.  With this, I kept it on the stand, so you had to slowly finesse your foot in.  I didn't think about it at the time, but I guess removing the stand was a smarter idea, lol.  Hindsight is 20/20?

There are three buttons on the back: 10 seconds, 20 seconds, & 30 seconds.  Since this is made for the Gelish system, these are the only times you'll need.  10 seconds for the foundation gel, 30 seconds for each coat of polish, and 20 seconds for the top seal.  And yes, it really does cure in those times (as seen on the video)!

Soooo....the good stuff: it cures your gels quickly and it's easy to use.  The bad stuff: it costs $329.99.  Now, as a layuser, I doubt I would spend the money on this when a regular UV lamp does the same for $55.  It just does it slower....But, maybe if I were a professional, I would be more inclined to buy it.  I think it would be pretty handy in a salon setting.  You can easily finish one hand in 8 minutes, then work on the other hand with out worrying about the first hand hitting anything.

I haven't seen the lamp from the starter kit, so I'm not sure how it compares.

So yeah...just some final thoughts: Do I love my lamp?  Hellz yeah....Would I recommend it?  Um, only if you can afford it, or just really want it, lol, or work at a salon. =)

Here are some pics of recent Gel manicures:

Gelish:
This is one coat of Bella's Vampire & one coat of Vegas Nights.  One coat of Bella's Vampire seems a little on the thin side....it shows how uneven my application is.  I've worn two coats of Bella's Vampire, and it definitely hides my flaws. =)


Gelac:
This is a French mani I did using IBD's Gelac in Pink & White.  Their formula is actually thinner than Gelish, so it definitely felt more like a polish.  However, my white turned into cottage cheese, and it's only been....2 months?  Not a happy camper about that.  Price-wise, it's about $13 a bottle (versus Gelish's $17)...


Gelac:
This is the same manicure as above, however, I added some Konad lace to it.  I can't remember which plate I used, so I'll update when I can. =)  I basically did a top seal, then the stamp, then another top seal.  This lasted for a nice long while...

**UPDATE: Check out my new Gelish Magneto Blog!

ShearUp.com is offering my readers a 10% discount if you use the Promo Code: PRINCESSTEA
(Please note that I don't receive anything if you use this promo code, it is strictly for your benefit.)

Disclaimer:
1. All the Gelish products in the video were provided by ShearUp.com as a gift. All other tools/products in the video are property of "D" Spot Salon.  Anything else mentioned on the blog has been purchased by me (or someone in my family).
2. No one has paid me or compensated me for this video or blog.
3. I am not affiliated with any of the companies of the products I used.
4. These are my honest opinions.
5

Gelish Plus Regular Polish

Monday, December 6, 2010
Hey Everyone!  I finally had a chance to do my nails properly!  This is my first polished look since I gave birth a month ago.

So I decided to test out what would happen if you used the Gelish base coat and top coat with regular polish in between.  This is the look I decided to go with...it's a nice wintery manicure. =)

You might have noticed, I filed my nails a little differently...instead of the square edge, I've decided to go with a more rounded look.  I'm just testing this out to see if I like it.  So far, I'm not crazy about how it looks, but it actually feels more comfortable and easy to manage than the square manicure.

Anyhoo, back to the polish!  First off, I used the PH bond, then put on a thin layer of the foundation gel.  After curing, I put on one coat of Orly's Winter Wonderland over the entire nail.  After letting this dry, I sponged on Orly's Royal Navy to the tips, adding an extra layer at the very tip to create a fade.  It's kinda hard to see in the pic, but it's there! =)  After, I used a clear top coat to adhere a light blue rhinestone to each nail (using just a drop where I wanted to place the rhinestone).  I let this dry, then put a thin layer of the Gelish top coat over the whole nail and cured it.  When it was done curing, I used alcohol to wipe off the tacky layer, and then added more of the top coat to just cover the rhinestone and cured it again.  Then I wiped off the nails one last time.

I wanted to see if this manicure would stay the 2 weeks like a full Gelish manicure would.  However, I already chipped 2 nails within 24 hours.  It was worth a try, though!   The chips are small, and I'm going to see how long this manicure lasts.  Well, see if it lasts until I get bored, anyway, lol.  I'll keep y'all posted!

In the meantime, I have a couple pics to update my Latisse use:

This is after 2 weeks of use.  I thought my lashes looked thicker, but my mom said I was imagining things.  LOL


This pic to the right was taken after 3 weeks of use.  I think my lashes definitely look thicker in this pic! My left lashes look thicker than my right lashes.  I can't really tell a difference in the length yet, but I'm not too worried.  Most people start to see a change around 6 weeks in.....so I guess I'm half way there? Hehehe


I also picked up a tube of Kat Von D's Painted Love Lipstick in Lovecraft.  I haven't actually tried it yet...I was in a rush in the store and just knew I liked the color.  Will post pics when I can!

Anyhoo, gotta run...hubby wants to sleep and is annoyed with my typing! Till next time!
0

Some Random Manicures I've Been Sporting...

Sunday, October 24, 2010
Hey Everyone!  I had an awesome time on Friday, and I'm sure you can guess where I was from the pic: BLIZZCON 2010!!!  And yes, that's a glittery Horde symbol on my cheek.  It took me 1/2 an hour to draw on, but I loved the way it turned out.  Sorry the pic is blurry...I didn't even take backups. =/ Ah wellz!


It was sooo much fun to test out Diablo 3 (this time they had 5 classes to check out...last year they only had 3).  They announced the last class: Demon Hunter...which sounds like it's going to be fun to play!  I also tested out Cataclysm beta, and played Worgen for the first time (last year I only tried the Goblins).  It looks like it's going to be fun as well.


But enough geek talk, moving on to makeup and nails!


So I decided to try out Finger Paints's "Be a Pal-ette".  I didn't take a pic of my look before I threw on a design, but you can kinda get a good idea of the color from the pics.


The color was pretty solid after two coats, and it's a pretty, shimmery, purple for the fall.  I wanted to do a Konad design, but I didn't have my plates with me at my new home (still at my parents's house, lol), so I just made do with what I had: mainly the white and silver striper polishes.


I know this kinda ends up to be my fallback design when I cover my whole nail in a polish.  I really should expand to more designs, but I don't really have a long attention span at the moment.  I like designs that are quick and easy. =)


In the top pic, I used Seche-V, the UV top coat.  Unfortunately, it does not work the same as their regular Seche Vite top coat.  I thought I had waited long enough for the design to dry, but when I applied the top coat, it smudged!  This normally doesn't happen with Seche Vite.  I was pretty disappointed.  Plus...after I set it with the UV lamp, it still wasn't really shinier or glossier than the regular Seche Vite top coat.  I might have to try this over a different polish to compare.
In the other pic (the one on the left), I used Seche Vite, and like I said, I couldn't really tell a difference between the two.  In fact, the one with Seche-V chipped first.  Sad, isn't it?  It also chipped within a few days...didn't even last a week.  I couldn't stand having chipped nails, so I decided to change my look.  I will say, though, the Seche-V removes pretty easily with nail polish remover.  I hate it when it takes forever to remove nail polish! LOL


Next, I decided to try MissChevious's Vampire Nail design.  Here's a link to her video: http://www.youtube.com/watch?v=pkgbp1mOe5Y .  This pic to the right shows two coats of China Glaze's "Lubu Heels".  It looks almost completely black, but you can still tell that there's a hint of red glitter.  Two coats gave a pretty opaque coverage.


I know in the video, MissChevious covers her whole nail in the vampy polish, but I was in the mood for a French, lol.
I added my fangs to the ring finger, and then added some drops of blood.


I think the mani turned out to be really cute!  I definitely like doing Halloween looks, although I'm not too fond of creating them myself (in case you haven't noticed, I haven't done a Halloween tut this year!).


I topped this look off with Seche Vite, and was happy to report that this look lasted a week before it chipped.


Lastly, I was tired of worrying about chipped polishes, so I decided to sport another Gelish manicure. =)  I'm still wearing this look.


Basically, this is Gelish's "High Bridge" as the base color and "Gossip Girl" as the tip.  I then put on a little nail art flower on each nail (from Sally's Beauty Supply), and topped it with a generous amount of Gelish's Top Seal to ensure I wouldn't lose it, lol.  So far, it's been about 4 days and it's lasting just fine.


I don't plan to change my nails anytime soon, but I'll keep you updated on how this manicure lasts.  Unfortunately, I broke my pointer finger on my left hand...instead of doing the "right" thing and taking off the Gelish manicure to fix, I've been trying to keep it together with just some nail glue.  But of course, this doesn't work...it stays solid for only a day....the break has gotten bigger now.  I may have to just suck it up and redo that nail properly. =/


Anyhoo, I realized that in my haul, I didn't mention that I did buy one other thing from the MAC Venomous Villains collection: a mineral eye shadow for Maleficent "My Dark Magic".


It's a black and pink shadow on one side, and a black and opalescent shadow on the other side.
I had a hard time deciding whether to get this duo or the other (She Who Dares).  I only decided on this one because I figured I'd use these colors more.  It's not very often I'd wear a dark green or dark blue shadow.


When I bought this, I was told the colors would show up better with a greasestick base (which I coincidentally already owned, lol).
As you can see, without the greasestick, the colors are very faint.  I'm sure you could layer it until you got the right color, but why bother when you can easily get the dark rich colors with a greasestick?


I absolutely love how it looks with the greasestick....it's like a black base with pink/opal shimmer.


So far, everytime I've worn this shadow, I've used my greasestick.  This also makes the colors stay on longer...at least 8 hours. =)


I think I'll experiment on this with my eye shadow mixing medium (aka Glycerin and water, lol).  I want to know if this make any impact at all....I'll let you guys know how it turns out. =)


Anyhoo...that's all I have for now.  Till next time!


PS Sorry if the blog looks a little funny...I had to change templates, and I'm having some technical difficulties, lol.  Hopefully the next post will look better.


Disclaimer:
1. I bought every product I'm showing by myself (nothing was sent to me for free). 
2. No one has paid me or compensated me for this video or blog.
3. I am not affiliated with any of the companies of the products I used.
4. These are my honest opinions.
0

Gelish French Heart Manicure

Saturday, September 18, 2010
Hi Everyone! After letting my nails rest a few days, I had finally found a design I wanted to try out.  This look is based on a picture I saw online...somewhere on Coolnailart.com.  Unfortunately I don't have the link or the name of who posted it, but if you see it or it's yours, please msg me so I can give you the proper credit!

So...back to the look.  Basically it's an arrow French, with a heart drawn in where the bottom point fits in snugly to the arrow.  It's a pretty cute idea, and I thought I'd give it a try.  Unfortunately, I draw hearts with a brush like a little boy would. =/  I'm sure with more practice I'll be able to get it....maybe.

Here's the video I uploaded to YouTube (Steps are simplified):


http://www.youtube.com/watch?v=4-K29b1oAfo

What I Used:


Bluish Holographic Glitter
Gelish: PH Bond
Gelish: Foundation Gel
Gelish: Water Field
Gelish: Gossip Girl
Gelish: Top Seal
Beauty Headquarters Gel: White


How to create the look:
*Note: If you want to do this look in regular nail polish, ignore the gel-requirements like curing and such.

Step 1: Clean nails with alcohol
Step 2: Apply PH Bond
Step 3: Apply a thin coat of Foundation Gel (Base Coat)
Step 4: Cure for 30 sec
Step 5: Apply one coat of Base Color (I used Gelish: Water Field)
Step 6: Cure for 1 min
Step 7: Apply one coat of Tip Color in a French Arrow Tip (I used Gelish: Gossip Girl)
Step 8: Cure for 1 min
Step 9: Apply second coat of Tip Color
Step 10: Cure for 1 min
Step 11: Draw a Heart (I used BH Gel: White)
Step 11a: If you want to, you can add glitter using a thin brush on top of the white. (Optional)
Step 11b: If you want to, you can add rhinestones (I used blue ones on my right hand.)
Step 12: Cure for 2 min
Step 13: Apply Top Seal (Top Coat)
Step 14: Cure for 2 min
Step 15: Clean of tacky layer with alcohol

And voila!  You have a French Heart Manicure!  This pic to the left is my right hand.  You can see that my left hand is totally incapable of drawing a good heart, but I tried to camouflage it with rhinestones.

Now, this look takes a lot of patience...I think I spent almost 2 hours....but I was super slow!  I'm sure if I had to do it again, I could do it in a lot less time.  The part that took really long was drawing those damn hearts, lol.  I bought a brush (shown in the pic above), but I realize now that I should've bought a thinner brush that could draw thin lines easier.  But I guess it's cool.  It was my first time using that kind of gel for nail art....I think it's really hard, but the gel is kinda forgiving.  I plan to try out flowers next...I've seen a video that makes it look easy.  =)

In this pic to the right, You can see that the glitter part got a little messy on my thumb.  I fixed this by putting a layer of top seal after the French tip, but before the white hearts.  This step is optional, but I just wanted to test it to see if it worked...which it did. =)

On my middle and pinky finger, I was able to brush off the excess glitter, whereas on my thumb the glitter stuck to my tacky layer.  I should've put glitter on my right hand because it looks like the glitter camouflages the poorly shaped hearts a lot better than the rhinestones, lol.

All in all, I'm actually pretty happy with how my nails turned out.  Obviously, my next try will look a lot better...but how often do I really re-do a look?  Well, once in a blue moon...like with 3TanjaJ3's look that I've repeated like 3 times already, lol.  I may try this out with regular nail polish....which I haven't worn in over a month, lol. =) This Gelish nail polish is just more convenient to wear because of the no-chipping and stuff, even if I don't last the whole 2 weeks before WANTING to change my polish, lol.

I've actually tried out using a gel-liner on my waterline and have taken some pics...I'll post that blog up sometime next week. =)

Till next time!

Disclaimer:
1. I bought every product I'm showing by myself (nothing was sent to me for free). 
2. No one has paid me or compensated me for this video or blog.
3. I am not affiliated with any of the companies of the products I used.
4. These are my honest opinions.
41

Gelish Polish Review

Saturday, September 4, 2010
Hi everyone!  I know I said I was going to post a blog sooner, but unfortunately, my mother (the DOCTOR) has expressed a deep desire for me to STOP w/ my nails!  Can you believe that?  Of course you can...I can only imagine how all the fumes and whatnot can affect the poor little dear inside me.  So, as a compromise, I've cut down...and I've dealt with the whole chipping thing with having her (yes, HER, lol) invest in a new gel polish system.  I couldn't afford it without her, and I'm blessed she still spoils me! =)

This pic here is me sporting a cute French Mani, courtesy of babsita84's Faded French Hologram Manicure: http://www.youtube.com/watch?v=wnj3evqlXGQ .  I think they turned out really cute, but it was quite tedious to do.  You are supposed to put each hologram glitter on one at a time...as you can see, I got lazy and did a few at a time, and so my fade looks a little funny. =(  Oh wellz!  I still like them!  And of course, I chose my Lakers Colors: Purple & Gold! =)  Can't wait for the season to start!

Now, on to the Gelish Polish Review!  Before actually buying a soak-off gel polish system, I did some research before choosing which brand I wanted to go with.  There are many reviews of the big 3: CND's Shellac, OPI's Axxium, and Harmony's Gelish.  The main reason I decided to go with Gelish over the others is the price.  My manicurist friend told me that you get more bang for your buck with Gelish.   LOL So yup, I brought my mom with me, and she seemed to like what she saw, so she bought me the whole system (as an investment, of course!).

*Update At ShearUp.com, there is a Gelish Starter Kit for $119.99!  (Much cheaper than the $200 my mom spent to buy all the stuff I needed, lol.)

Now, this does seem a little pricey....but, you need to look at it from the other side as well.  A typical gel polish manicure here, in the LA area, runs you about $30.  I know on the east coast, they run closer to $60.  So, if I do at least 5 manis/pedis with this set, I will have made it worth its investment.  I've already done that, actually...mani/pedi on mom, mani/pedi on me (plus an extra French mani now!), and a mani/pedi on my mom's friend.  That's 7 total...which is about $210.  Not bad for owning it for 2 weeks, eh?

To the right is how my nails looked right after I was finished with them.  The system is pretty simple.

Step 1: File/Shape your nails, push cuticles back.

Step 2: Clean nails with alcohol (on a lint-free wipe).

Step 3: Apply PH Bond.

Step 4: Apply Foundation Gel.

Step 5: Cure for 30 seconds.

Step 6: Apply 1 coat of color polish.  (In my pic, my first coat was Gossip Girl.)

Step 7: Cure for 1 minute.

Step 8: Apply 2nd coat of color polish.  (In my pic, my second coat was Water Field.)

Step 8: Cure for 1 minute.

Step 9: Apply Top Seal.

Step 10: Cure for 2 minutes.

Step 11: Remove tacky layer with alcohol (on a lint-free wipe).

And you're done!  All in all it took about 30 minutes to do one manicure.  Not too shabby!

Since it was my first try, I didn't do a great job...I got too close to the cuticles, and my top coat was too thick.  My second time around, I kept all my coats thin, and the mani looks MUCH better!

This pic to the left is from the 2nd day.  They look exactly how they did the day before.  I wish you could see how shiny my nails are...it was almost as shiny as glass.  The gels have a beautiful finish.

This pic to the right is from Day 3.  You can kinda see the shine a little better from this angle, but the picture doesn't do it justice!  The nails still look perfect...no chipping, no wear & tear at the tip.

Because I went too close to the cuticle, some of the polish lifted a little toward that end.  You can't tell in the pictures, but you can feel it...especially when running your fingers through you hair! LOL  So that was my bad...other people have reported that they stay in perfect condition for 10-14 days, even longer.

This next picture to the left is from  Day 5.  They look like I just got them done!  You can kinda see that my nails are growing out a little, but besides that, they look great.

At this point, I was kinda getting annoyed with the length of the nails...This was the longest I've kept them in awhile, and they just started to bug me.  I didn't do anything about it at this point, because I wanted to keep taking pics...hehehe.


Sorry this picture is blurry!  Sometimes you look at the little tiny screen on your camera and it looks perfect...but when you look at it on your big monitor...it's blurry as hell.  Oh wellz...

This is from the last day I kept my manicure: Day 7.  At this point, I really wanted to cut my nails to a more manageable length.  From inspecting my nails, I could tell that the manicure would last at least a few days more, but I was also bored with the color.  I mean it's pretty....but to wear for an extended period?  I would need something more my style, like... a French manicure! LOL  So that's why I removed them (soaking in acetone for 10 minutes then removing with an orange stick is the proper method), and began a new manicure!

Here is a pic of my mom's manicure.  This is two coats of June Bride.  I think my application was a little flawed because in the pic, the color looks darker on the tips.  But this was back when I was still figuring it out, so don't judge! LOL  She has also removed her polish, but she didn't want to get a new manicure yet...she broke two nails yesterday while cooking, and she doesn't know what she wants to do yet, lol.  She said her nails grow fast and I think she wants to wait for them to be a little longer before doing another Gelish manicure.  Two weeks is a pretty long commitment....

So this is my current manicure...my right hand.  I used Water Field as my base, and Good Gossip as my French Tip color.  Then I added some big bling in Teal & AB.  I was basically doing this to test if rhinestones stay better with the gel system.  Unfortunately, these rhinestones were too big...the top seal is too thin to have a rigid hold on the rhinestones.  I think I should use regular clear gel to secure them...


Here is my left hand...with light pink & AB rhinestones.  I think the teal stands out a lot better, but the pink does have a nice soft look.  These two pics were taken right after I finished my manicure.

Unfortunately, I lost a few rhinestones already...replaced them, and have lost one again.  This is definitely a pain in the butt....the lost rhinestones leave a ridge, so my nails aren't smooth. =( Bleh!

And also unfortunately, the camera is not picking up the gorgeous gel shine and all the sparkles!  LOL  But, as you can see from the pics, I don't look like I'm wearing anything but regular nail polish!  My coats are very thin and even, and I stayed the proper distance from my cuticles.  My top seal is a little thick on the nails that have the rhinestones, but I'll have to figure out a better way to apply those next time.  I think my mom wants some bling in her next mani, lol.

I did post a quick video on YouTube showing all the pics above.  It was just a slideshow, but here's the link anyway!


It's hard for me to compare Gelish to other brands...I've heard that Shellac actually applies thinner (perhaps easier?), but have you seen the bottles?  They're smaller than the Gelish ones!  Both are about the same price, but the Gelish Polish comes with .5 floz while the Shellac only comes with .25 floz.  Crazy!  You get double the product for the same price!  I don't know if you'll necessarily use 1/2 as much Shellac just because the product applies thinner, but I don't feel like my coats of Gelish are THAT thick anyway.  The Axxium system doesn't come in a nail polish-like bottle (which Gelish & Shellac do).  The Axxium gels come in a pot, which you need a separate brush to apply.  Each pot runs around the same price as Gelish and Shellac, but it only comes with .14 oz (not sure how that converts to floz).  I believe the Axxium system applies the thickest of the three.

I'm really happy with the Gelish system...which seems to have more color choices than the other two.  I don't think I'll be trying Shellac, but the OPI colors do interest me (I absolutely adore "I'm not Really a Waitress"!). I'm quite tempted to try it out...but I don't think that'll happen in the *near* future.  Will keep you updated if I do test it out!  Maybe I'll ask my manicurist friend if I can mooch of her, tee-hee!

Anyhoo, will have to wait and see when my next post is!  It'll prolly be a little sporadic until a few months after the baby is born, but I'll try to post stuff when I can! =)

Update: ShearUp.com is offering my readers 10% off if you use the promo code: PRINCESSTEA
(Please note that I don't get anything if you use this promo code.  This is completely for your benefit!)

Update: I posted a new video/blog on the application of Gelish: http://miniteababy.blogspot.com/2011/05/gelish-manicure-review-on-6g-led-lamp.html

Btw, happy birthday to my loving Hubby!

Peace!

**UPDATE: Check out my review on Gelish Magneto!

Disclaimer:
1. I bought every product I'm showing by myself (nothing was sent to me for free). -- Exception, my mom bought me the Gelish Polish System. =)
2. No one has paid me or compensated me for this video or blog.
3. I am not affiliated with any of the companies of the products I used.
4. These are my honest opinions.