Hi Everyone! It's been a couple weeks since my last post, so I thought I'd just do a quick look at some of the Gelish manicures I've done. =)
This pic the left is just a simple glittery tip. The base color is Desert Sands and the tip color is Night Shimmer. To achieve this look, I used two coats of Desert Sands, then used a sponge to dab on Night Shimmer on the tips. I concentrated more at the edge of the tip, so it had a faded effect.
I had a couple bumps because I didn't remove my last Gelish manicure properly, and didn't notice until the I had already cured a layer of the Desert Sands. *sigh* Shame on me for being lazy!!
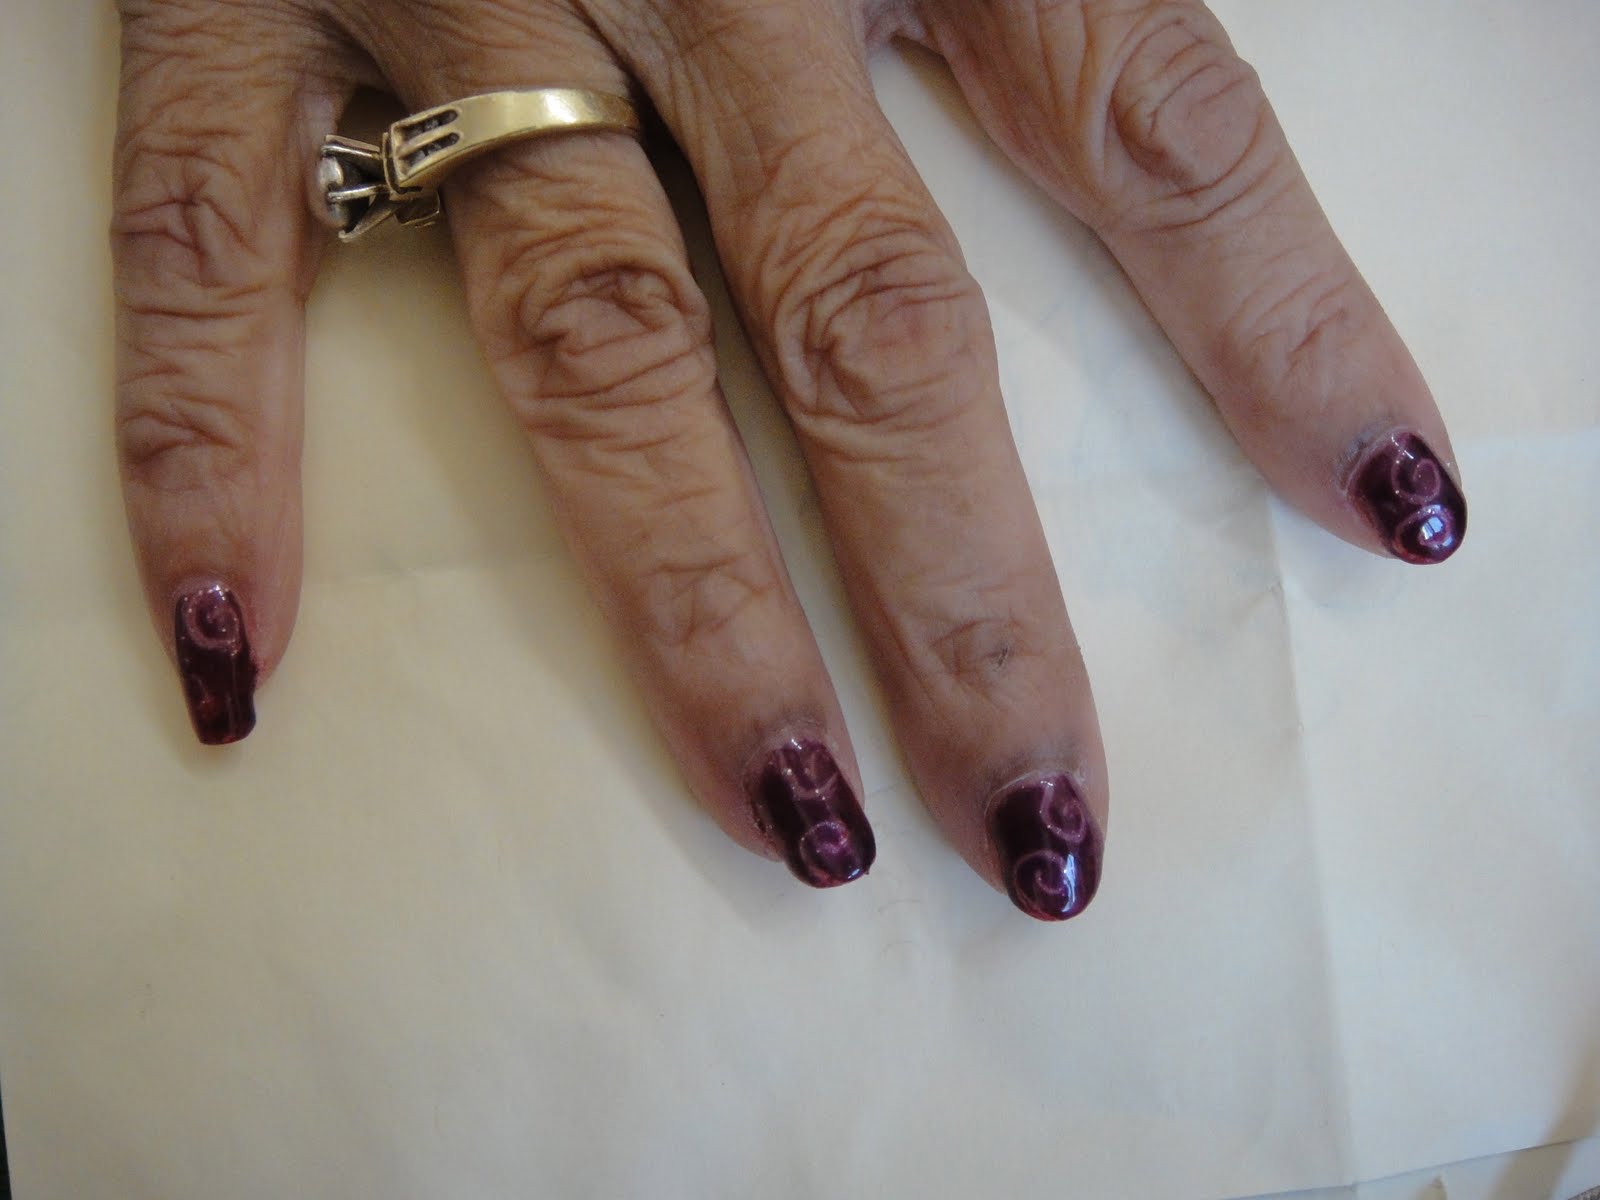
This next manicure is one I did on my mom. I had found a video on YouTube and tried to follow her design. Unfortunately, I don't have the link, but I'm sure it's easy to find if you search for Gelish Design or something (it's a 5 or more part series of videos). Basically, after the Foundation coat, I put Vegas Nights all over the nail and cured. Then Good Gossip on just the tip and cured. After, I put a dark purple (don't have the name right now, sorry! Will try to update) over the whole nail. Before curing, I used an orange stick to draw out the swirls on one hand, and flowers on the other. I let that cure, and put on a top coat. In the end, I wish I chose more contrasting colors, but I think they turned out decent for a first try.
Next time, I'll try to have a design in front of me, versus just winging it. LOL
This next design was done on my Aunt from SF. It's the same concept, but instead, I put a neutral colored base over the whole nail, and only did the design on the tip. Under the pink, I had Vegas Nights. Then I covered it up with Go Girl. I used an orange stick to put in the lines so the glitter underneath would show. Unfortunately, it was kinda too light to see. But my aunt didn't want anything too flashy anyway. =) On the pinky, you can see a couple darker pink glitter...it's because I added a coat of Tumberline Violet to the tip and tried to arrange the glitter so it would peep through.
This last design was done on another Aunt. She's not really allowed to wear nail polish at work, so I try to keep her nails more subtle. But I needed to make this stand out a tinsy bit, because she was going to a wedding, so I came up with this color combination.
The base color is Forever Beauty, and the tips are High Bridge. Just like my own manicure, I applied High Bridge with a sponge.
I think (hope) it's not overly noticeable! LOL
I had one more design, but for some reason I can't find the pictures for them! Grrr...I think it was on my phone and I recently just got a new one. I'll hunt for it....
Well, I hope you enjoyed this post on different looks I've done with Gelish. Hopefully, I'll be able to try out more designs on my guinea pigs LOL.
Till next time!
Disclaimer:
1. All the products were given to me as a gift from ShearUp.com.
2. No one is paying me for this blog.
3. No one has asked me to do this blog.
4. These are my honest opinions.
I know I know, I've been gone forever....shame on me, blah blah, lol. But I'm happy to report that my little one is about 6 months, and isn't quite so needy anymore. He actually takes some time to play by himself now, yay! So, hopefully that means more time for blogging and videos! One can dream, right?
Anyhoo, I collaborated with a good friend of mine, who's a licensed cosmetologist, to create a video on the application of Gelish Polish.
ShearUp.com was nice enough to provide us with all the Gelish Products. Please note that they are not compensating me for this blog or the video I created. The thing I loved the most was the LED Lamp. This lamp retails for $329.99 (I think...), and it is frickin' awesome. It really does cure the gel in seconds! More on that in a bit.
What We Used:
Buffer (sorry, don't know the grit!)
Gelish PH Bond
Gelish Foundation Gel
Gelish Jet Set
Gelish Top Seal
Rubbing Alcohol
Gelish 6G LED Lamp
I know we could've fast-forwarded through all the curing and stuff, but I just wanted to show the entire manicure, in one cut, in real-time. Just to give you a sense of what it's really like. =) Sorry for the weird editing at the end!
Note: Cure times based on Gelish's LED Lamp.
Manicurist:
Denise
"D" Spot Salon
684 S. La Brea Ave.
Los Angeles, CA 90036
(626) 695-6837
www.dspotsalon.com
I think she normally charges $35 for a Gelish manicure. =)
It was fun shooting the video with her, and I feel like I benefited from watching a professional apply Gelish. Apparently my manicures on my mom and friends look very amateurish compared to hers. But, then again...she IS a professional! LOL I definitely intend to try out her methods the next time I give someone a Gelish manicure. (Please note, I only give them to my mom and a few select friends/family...and I do it for free, hehe.) Things to do: Keep coats thin, cap the edges, make sure your whole hand is in the lamp. =)
Now, onto the mini-review. I got this Gelish 6G LED Lamp, and I am totally enjoying it. I've only used regular UV Lamps before this, so I'm afraid I don't have much to compare it to.
Basically it's just large enough for one hand or foot to fit inside. The stand makes it tricky to put in your foot. With the basic UV lamp, you could just put your foot on the floor and slowly slide it in. With this, I kept it on the stand, so you had to slowly finesse your foot in. I didn't think about it at the time, but I guess removing the stand was a smarter idea, lol. Hindsight is 20/20?
There are three buttons on the back: 10 seconds, 20 seconds, & 30 seconds. Since this is made for the Gelish system, these are the only times you'll need. 10 seconds for the foundation gel, 30 seconds for each coat of polish, and 20 seconds for the top seal. And yes, it really does cure in those times (as seen on the video)!
Soooo....the good stuff: it cures your gels quickly and it's easy to use. The bad stuff: it costs $329.99. Now, as a layuser, I doubt I would spend the money on this when a regular UV lamp does the same for $55. It just does it slower....But, maybe if I were a professional, I would be more inclined to buy it. I think it would be pretty handy in a salon setting. You can easily finish one hand in 8 minutes, then work on the other hand with out worrying about the first hand hitting anything.
I haven't seen the lamp from the starter kit, so I'm not sure how it compares.
So yeah...just some final thoughts: Do I love my lamp? Hellz yeah....Would I recommend it? Um, only if you can afford it, or just really want it, lol, or work at a salon. =)
Here are some pics of recent Gel manicures:
Gelish:
This is one coat of Bella's Vampire & one coat of Vegas Nights. One coat of Bella's Vampire seems a little on the thin side....it shows how uneven my application is. I've worn two coats of Bella's Vampire, and it definitely hides my flaws. =)
Gelac:
This is a French mani I did using IBD's Gelac in Pink & White. Their formula is actually thinner than Gelish, so it definitely felt more like a polish. However, my white turned into cottage cheese, and it's only been....2 months? Not a happy camper about that. Price-wise, it's about $13 a bottle (versus Gelish's $17)...
Gelac:
This is the same manicure as above, however, I added some Konad lace to it. I can't remember which plate I used, so I'll update when I can. =) I basically did a top seal, then the stamp, then another top seal. This lasted for a nice long while...
ShearUp.com is offering my readers a 10% discount if you use the Promo Code: PRINCESSTEA
(Please note that I don't receive anything if you use this promo code, it is strictly for your benefit.)
Disclaimer: 1. All the Gelish products in the video were provided by ShearUp.com as a gift. All other tools/products in the video are property of "D" Spot Salon. Anything else mentioned on the blog has been purchased by me (or someone in my family).
2. No one has paid me or compensated me for this video or blog.
3. I am not affiliated with any of the companies of the products I used.
4. These are my honest opinions.
Hey Everyone! I had an awesome time on Friday, and I'm sure you can guess where I was from the pic: BLIZZCON 2010!!! And yes, that's a glittery Horde symbol on my cheek. It took me 1/2 an hour to draw on, but I loved the way it turned out. Sorry the pic is blurry...I didn't even take backups. =/ Ah wellz!
It was sooo much fun to test out Diablo 3 (this time they had 5 classes to check out...last year they only had 3). They announced the last class: Demon Hunter...which sounds like it's going to be fun to play! I also tested out Cataclysm beta, and played Worgen for the first time (last year I only tried the Goblins). It looks like it's going to be fun as well.
But enough geek talk, moving on to makeup and nails!
So I decided to try out Finger Paints's "Be a Pal-ette". I didn't take a pic of my look before I threw on a design, but you can kinda get a good idea of the color from the pics.
The color was pretty solid after two coats, and it's a pretty, shimmery, purple for the fall. I wanted to do a Konad design, but I didn't have my plates with me at my new home (still at my parents's house, lol), so I just made do with what I had: mainly the white and silver striper polishes.
I know this kinda ends up to be my fallback design when I cover my whole nail in a polish. I really should expand to more designs, but I don't really have a long attention span at the moment. I like designs that are quick and easy. =)
In the top pic, I used Seche-V, the UV top coat. Unfortunately, it does not work the same as their regular Seche Vite top coat. I thought I had waited long enough for the design to dry, but when I applied the top coat, it smudged! This normally doesn't happen with Seche Vite. I was pretty disappointed. Plus...after I set it with the UV lamp, it still wasn't really shinier or glossier than the regular Seche Vite top coat. I might have to try this over a different polish to compare. In the other pic (the one on the left), I used Seche Vite, and like I said, I couldn't really tell a difference between the two. In fact, the one with Seche-V chipped first. Sad, isn't it? It also chipped within a few days...didn't even last a week. I couldn't stand having chipped nails, so I decided to change my look. I will say, though, the Seche-V removes pretty easily with nail polish remover. I hate it when it takes forever to remove nail polish! LOL
Next, I decided to try MissChevious's Vampire Nail design. Here's a link to her video: http://www.youtube.com/watch?v=pkgbp1mOe5Y . This pic to the right shows two coats of China Glaze's "Lubu Heels". It looks almost completely black, but you can still tell that there's a hint of red glitter. Two coats gave a pretty opaque coverage.
I know in the video, MissChevious covers her whole nail in the vampy polish, but I was in the mood for a French, lol.
I added my fangs to the ring finger, and then added some drops of blood.
I think the mani turned out to be really cute! I definitely like doing Halloween looks, although I'm not too fond of creating them myself (in case you haven't noticed, I haven't done a Halloween tut this year!).
I topped this look off with Seche Vite, and was happy to report that this look lasted a week before it chipped.
Lastly, I was tired of worrying about chipped polishes, so I decided to sport another Gelish manicure. =) I'm still wearing this look.
Basically, this is Gelish's "High Bridge" as the base color and "Gossip Girl" as the tip. I then put on a little nail art flower on each nail (from Sally's Beauty Supply), and topped it with a generous amount of Gelish's Top Seal to ensure I wouldn't lose it, lol. So far, it's been about 4 days and it's lasting just fine.
I don't plan to change my nails anytime soon, but I'll keep you updated on how this manicure lasts. Unfortunately, I broke my pointer finger on my left hand...instead of doing the "right" thing and taking off the Gelish manicure to fix, I've been trying to keep it together with just some nail glue. But of course, this doesn't work...it stays solid for only a day....the break has gotten bigger now. I may have to just suck it up and redo that nail properly. =/
Anyhoo, I realized that in my haul, I didn't mention that I did buy one other thing from the MAC Venomous Villains collection: a mineral eye shadow for Maleficent "My Dark Magic".
It's a black and pink shadow on one side, and a black and opalescent shadow on the other side.
I had a hard time deciding whether to get this duo or the other (She Who Dares). I only decided on this one because I figured I'd use these colors more. It's not very often I'd wear a dark green or dark blue shadow.
When I bought this, I was told the colors would show up better with a greasestick base (which I coincidentally already owned, lol).
As you can see, without the greasestick, the colors are very faint. I'm sure you could layer it until you got the right color, but why bother when you can easily get the dark rich colors with a greasestick?
I absolutely love how it looks with the greasestick....it's like a black base with pink/opal shimmer.
So far, everytime I've worn this shadow, I've used my greasestick. This also makes the colors stay on longer...at least 8 hours. =)
I think I'll experiment on this with my eye shadow mixing medium (aka Glycerin and water, lol). I want to know if this make any impact at all....I'll let you guys know how it turns out. =)
Anyhoo...that's all I have for now. Till next time!
PS Sorry if the blog looks a little funny...I had to change templates, and I'm having some technical difficulties, lol. Hopefully the next post will look better.
Disclaimer: 1. I bought every product I'm showing by myself (nothing was sent to me for free). 2. No one has paid me or compensated me for this video or blog. 3. I am not affiliated with any of the companies of the products I used. 4. These are my honest opinions.

 Next time, I'll try to have a design in front of me, versus just winging it. LOL
 This last design was done on another Aunt. She's not really allowed to wear nail polish at work, so I try to keep her nails more subtle. But I needed to make this stand out a tinsy bit, because she was going to a wedding, so I came up with this color combination.


