Hi Everyone! It's been a couple weeks since my last post, so I thought I'd just do a quick look at some of the Gelish manicures I've done. =)
This pic the left is just a simple glittery tip. The base color is Desert Sands and the tip color is Night Shimmer. To achieve this look, I used two coats of Desert Sands, then used a sponge to dab on Night Shimmer on the tips. I concentrated more at the edge of the tip, so it had a faded effect.
I had a couple bumps because I didn't remove my last Gelish manicure properly, and didn't notice until the I had already cured a layer of the Desert Sands. *sigh* Shame on me for being lazy!!
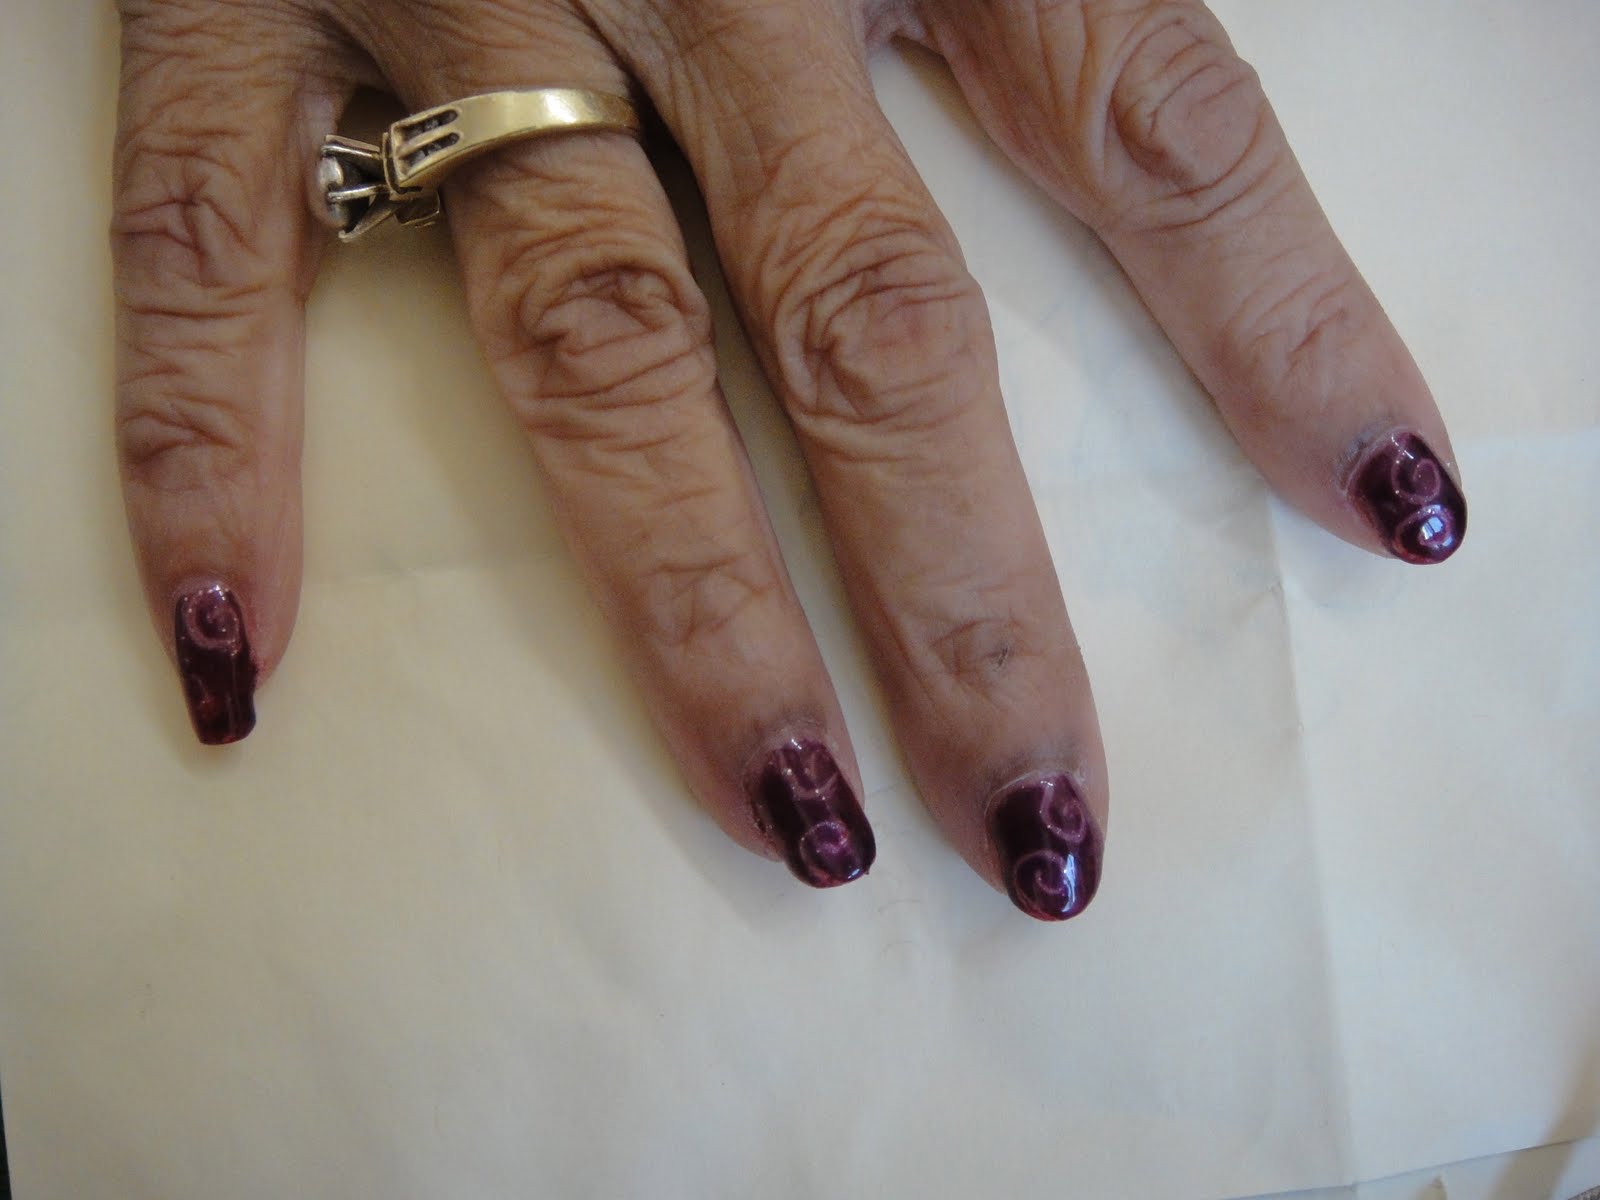
This next manicure is one I did on my mom. I had found a video on YouTube and tried to follow her design. Unfortunately, I don't have the link, but I'm sure it's easy to find if you search for Gelish Design or something (it's a 5 or more part series of videos). Basically, after the Foundation coat, I put Vegas Nights all over the nail and cured. Then Good Gossip on just the tip and cured. After, I put a dark purple (don't have the name right now, sorry! Will try to update) over the whole nail. Before curing, I used an orange stick to draw out the swirls on one hand, and flowers on the other. I let that cure, and put on a top coat. In the end, I wish I chose more contrasting colors, but I think they turned out decent for a first try.
Next time, I'll try to have a design in front of me, versus just winging it. LOL
This next design was done on my Aunt from SF. It's the same concept, but instead, I put a neutral colored base over the whole nail, and only did the design on the tip. Under the pink, I had Vegas Nights. Then I covered it up with Go Girl. I used an orange stick to put in the lines so the glitter underneath would show. Unfortunately, it was kinda too light to see. But my aunt didn't want anything too flashy anyway. =) On the pinky, you can see a couple darker pink glitter...it's because I added a coat of Tumberline Violet to the tip and tried to arrange the glitter so it would peep through.
This last design was done on another Aunt. She's not really allowed to wear nail polish at work, so I try to keep her nails more subtle. But I needed to make this stand out a tinsy bit, because she was going to a wedding, so I came up with this color combination.
The base color is Forever Beauty, and the tips are High Bridge. Just like my own manicure, I applied High Bridge with a sponge.
I think (hope) it's not overly noticeable! LOL
I had one more design, but for some reason I can't find the pictures for them! Grrr...I think it was on my phone and I recently just got a new one. I'll hunt for it....
Well, I hope you enjoyed this post on different looks I've done with Gelish. Hopefully, I'll be able to try out more designs on my guinea pigs LOL.
Till next time!
Disclaimer:
1. All the products were given to me as a gift from ShearUp.com.
2. No one is paying me for this blog.
3. No one has asked me to do this blog.
4. These are my honest opinions.
While posting (and stalking!) on Facebook, I saw an ad for.....D Spot Salon! They're apparently having a deal right now where you can get a Gel Manicure for $20 (normally $35). Just thought I'd pass this along to anyone in the LA area that's interested in trying it out. =) The deal is on Lifebooker Loot. And FYI, I'm not getting anything for this post or if you buy the deal...just randomly saw it and thought it was a good deal, lol. Be warned: this deal is only good until Friday!
If you have any questions about D Spot Salon, don't hesitate to leave a comment. =)
I know I know, I've been gone forever....shame on me, blah blah, lol. But I'm happy to report that my little one is about 6 months, and isn't quite so needy anymore. He actually takes some time to play by himself now, yay! So, hopefully that means more time for blogging and videos! One can dream, right?
Anyhoo, I collaborated with a good friend of mine, who's a licensed cosmetologist, to create a video on the application of Gelish Polish.
ShearUp.com was nice enough to provide us with all the Gelish Products. Please note that they are not compensating me for this blog or the video I created. The thing I loved the most was the LED Lamp. This lamp retails for $329.99 (I think...), and it is frickin' awesome. It really does cure the gel in seconds! More on that in a bit.
What We Used:
Buffer (sorry, don't know the grit!)
Gelish PH Bond
Gelish Foundation Gel
Gelish Jet Set
Gelish Top Seal
Rubbing Alcohol
Gelish 6G LED Lamp
I know we could've fast-forwarded through all the curing and stuff, but I just wanted to show the entire manicure, in one cut, in real-time. Just to give you a sense of what it's really like. =) Sorry for the weird editing at the end!
Note: Cure times based on Gelish's LED Lamp.
Manicurist:
Denise
"D" Spot Salon
684 S. La Brea Ave.
Los Angeles, CA 90036
(626) 695-6837
www.dspotsalon.com
I think she normally charges $35 for a Gelish manicure. =)
It was fun shooting the video with her, and I feel like I benefited from watching a professional apply Gelish. Apparently my manicures on my mom and friends look very amateurish compared to hers. But, then again...she IS a professional! LOL I definitely intend to try out her methods the next time I give someone a Gelish manicure. (Please note, I only give them to my mom and a few select friends/family...and I do it for free, hehe.) Things to do: Keep coats thin, cap the edges, make sure your whole hand is in the lamp. =)
Now, onto the mini-review. I got this Gelish 6G LED Lamp, and I am totally enjoying it. I've only used regular UV Lamps before this, so I'm afraid I don't have much to compare it to.
Basically it's just large enough for one hand or foot to fit inside. The stand makes it tricky to put in your foot. With the basic UV lamp, you could just put your foot on the floor and slowly slide it in. With this, I kept it on the stand, so you had to slowly finesse your foot in. I didn't think about it at the time, but I guess removing the stand was a smarter idea, lol. Hindsight is 20/20?
There are three buttons on the back: 10 seconds, 20 seconds, & 30 seconds. Since this is made for the Gelish system, these are the only times you'll need. 10 seconds for the foundation gel, 30 seconds for each coat of polish, and 20 seconds for the top seal. And yes, it really does cure in those times (as seen on the video)!
Soooo....the good stuff: it cures your gels quickly and it's easy to use. The bad stuff: it costs $329.99. Now, as a layuser, I doubt I would spend the money on this when a regular UV lamp does the same for $55. It just does it slower....But, maybe if I were a professional, I would be more inclined to buy it. I think it would be pretty handy in a salon setting. You can easily finish one hand in 8 minutes, then work on the other hand with out worrying about the first hand hitting anything.
I haven't seen the lamp from the starter kit, so I'm not sure how it compares.
So yeah...just some final thoughts: Do I love my lamp? Hellz yeah....Would I recommend it? Um, only if you can afford it, or just really want it, lol, or work at a salon. =)
Here are some pics of recent Gel manicures:
Gelish:
This is one coat of Bella's Vampire & one coat of Vegas Nights. One coat of Bella's Vampire seems a little on the thin side....it shows how uneven my application is. I've worn two coats of Bella's Vampire, and it definitely hides my flaws. =)
Gelac:
This is a French mani I did using IBD's Gelac in Pink & White. Their formula is actually thinner than Gelish, so it definitely felt more like a polish. However, my white turned into cottage cheese, and it's only been....2 months? Not a happy camper about that. Price-wise, it's about $13 a bottle (versus Gelish's $17)...
Gelac:
This is the same manicure as above, however, I added some Konad lace to it. I can't remember which plate I used, so I'll update when I can. =) I basically did a top seal, then the stamp, then another top seal. This lasted for a nice long while...
ShearUp.com is offering my readers a 10% discount if you use the Promo Code: PRINCESSTEA
(Please note that I don't receive anything if you use this promo code, it is strictly for your benefit.)
Disclaimer: 1. All the Gelish products in the video were provided by ShearUp.com as a gift. All other tools/products in the video are property of "D" Spot Salon. Anything else mentioned on the blog has been purchased by me (or someone in my family).
2. No one has paid me or compensated me for this video or blog.
3. I am not affiliated with any of the companies of the products I used.
4. These are my honest opinions.
I hope everyone enjoyed their New Year! I spent a quiet night at home....made dinner with friends and family, then watched the ball drop on TV. Unfortunately, we had to watch MTV and the whole Snookie ball drop, but I did get to "join in" the whole world record fist pumping thing! Hahaha, my hubby made fun of me and refused to join in.
So to catch y'all up on why I haven't had the chance to post (besides that whole baby thing, lol): my ceiling collapsed on my bed!! It took them 3 weeks to fix it, and now we're just waiting for a bed before we can move back in. In the meantime, we're living at my parents' house. My mother-in-law just opened a restaurant, so she's super busy....and I don't have as much help with the baby anymore. I haven't had any polish on my nails since Christmas (was going to do something for NYE, but didn't have spare time!), so I'm itching to do something. Most likely I'll do another Gelish mani because I don't have to worry about it chipping for 2 weeks. Quite mommy-friendly, huh? LOL
I've gotten some new subscribers and followers since my last post, which makes me feel really happy! =) Thanks for joining the Juicy Side! Hehehe....it's pretty cool to know that some of the reviews and info on my blog is helpful to people out there when making a purchase. If you have any questions, e-mail works better: princess.tea@gmail.com , versus writing a comment. For some reason, blogger isn't sending me a notice when I have new comment, so I've been really bad about responding! I'm not doing it on purpose...I like to reply within 1-2 days! The only reason I noticed was because I decided to print out my blog and I've gone through all my old blog posts since 2009. I can't wait until I get my blog-book printed! I think it'll be fun to have...and show people. =) I'm a nerd, what can I say!
Well, some things I plan on posting in the near future: Latisse update, perhaps a new Gelish mani post, maybe a scrapbook post on the baby (I've finished a whole 3 pages, go me!), and I've been dying to do a Konad post. Can you believe I've had Konad since it first came out, and I haven't done a post on it? LOL Hopefully soon to change in the next month. Although I'm not working yet, I've begun applying for jobs, I have clients I've found on my own, and watching a baby is a 24 hour job. One of my NY Resolutions is to post as much as I can this year. I think last year I wanted to do it weekly....but this year I want to be more realistic. If I can post twice a month, I'll be happy. =)
Hey Everyone! I finally had a chance to do my nails properly! This is my first polished look since I gave birth a month ago.
So I decided to test out what would happen if you used the Gelish base coat and top coat with regular polish in between. This is the look I decided to go with...it's a nice wintery manicure. =)
You might have noticed, I filed my nails a little differently...instead of the square edge, I've decided to go with a more rounded look. I'm just testing this out to see if I like it. So far, I'm not crazy about how it looks, but it actually feels more comfortable and easy to manage than the square manicure.
Anyhoo, back to the polish! First off, I used the PH bond, then put on a thin layer of the foundation gel. After curing, I put on one coat of Orly's Winter Wonderland over the entire nail. After letting this dry, I sponged on Orly's Royal Navy to the tips, adding an extra layer at the very tip to create a fade. It's kinda hard to see in the pic, but it's there! =) After, I used a clear top coat to adhere a light blue rhinestone to each nail (using just a drop where I wanted to place the rhinestone). I let this dry, then put a thin layer of the Gelish top coat over the whole nail and cured it. When it was done curing, I used alcohol to wipe off the tacky layer, and then added more of the top coat to just cover the rhinestone and cured it again. Then I wiped off the nails one last time.
I wanted to see if this manicure would stay the 2 weeks like a full Gelish manicure would. However, I already chipped 2 nails within 24 hours. It was worth a try, though! The chips are small, and I'm going to see how long this manicure lasts. Well, see if it lasts until I get bored, anyway, lol. I'll keep y'all posted!
In the meantime, I have a couple pics to update my Latisse use:
This is after 2 weeks of use. I thought my lashes looked thicker, but my mom said I was imagining things. LOL
This pic to the right was taken after 3 weeks of use. I think my lashes definitely look thicker in this pic! My left lashes look thicker than my right lashes. I can't really tell a difference in the length yet, but I'm not too worried. Most people start to see a change around 6 weeks in.....so I guess I'm half way there? Hehehe
I also picked up a tube of Kat Von D's Painted Love Lipstick in Lovecraft. I haven't actually tried it yet...I was in a rush in the store and just knew I liked the color. Will post pics when I can!
Anyhoo, gotta run...hubby wants to sleep and is annoyed with my typing! Till next time!
Hey everyone! So I wanted to do a quick update on my Latisse experience so far. This pic was taken before I started using Latisse. Mind you, I haven't used any eyelash lengthening products since March--approximately 8 months (basically since I found out I was preggerz, lol). As you can see, my eyelashes are hardly visible, and they are very straight. My lower lashes are pretty short, as well.
So the one week update (sorry, no pic - you really can't see THAT big of a dif!) is that my lashes look a *tiny* bit longer, but they have started to curl at the ends too. Yay! I can tell that it's working, and I just need to be diligent about applying Latisse every day.
How I use Latisse: I just follow the instructions -- Put a drop on the sterile brushes that came with the kit and swipe it along the upper lash line of each eye, once every night. I was told by someone else who was prescribed Latisse that she was told to use it twice a day. I guess this would have to be okayed by your doctor, because Latisse has the potential to mess with your eye pressure or something. I'll have to ask mine the next time I see her.
I'll keep y'all updated, but I've been told not to really expect results for 90 days. Also, as a quick update, my broken nails still need some time to grow out....especially my thumb. BLEH! Lol
Hey everyone, I just wanted to do a quick update, since I've been a little MIA. I gave birth to a beautiful baby boy on November 6, 2010. I had to have an emergency C-section, but am recovering pretty nicely. Unfortunately, I broke 2 nails at the hospital, and have now cut down all my nails. =( It's okay though, gives them time to grow out healthier...or they would be healthier if I could remember to put on cuticle oil!! LOL
On another note, now that I am not pregnant anymore, I have officially started using Latisse. I tried to take some "before" pics, but they kinda turned out blurry. I'll be posting a short blurb about that when I have a chance.
Anyhoo, I'll try to post more nail stuff when my nails grow out. Unfortunately, one of the breaks is about 1/2 way down my nail bed, and it's on my thumb. =( I swear, my thumb nail is like the slowest growing nail ever....I suppose it could because it's also the biggest, but yeah...it's going to be awhile. In the meantime, I'll try to figure out other beauty stuff to post about.
Don't you just love the Paul Frank onesie? I think TnT actually fits into it now...but I'm trying to make sure he wears everything at least once, so he might not make it back to the Paul Frank one before he grows out of it. We'll see....

 Next time, I'll try to have a design in front of me, versus just winging it. LOL
 This last design was done on another Aunt. She's not really allowed to wear nail polish at work, so I try to keep her nails more subtle. But I needed to make this stand out a tinsy bit, because she was going to a wedding, so I came up with this color combination.


